How our app is hosted
Are you an engineer or developer who loves the simplicity of platforms like Vercel, Heroku, or Render, but you’re tired of the growing monthly fees and the lack of full control over your infrastructure?
I was too. I wanted full ownership of my server, complete control over backups and scaling, and zero vendor lock-in.
That’s why I chose Hostinger - Hostinger has a huge discount right now + if you use code “webprodigies“ at checkout you’ll get an even bigger discount.
Coolify is an open-source, self-hostable alternative to popular deployment platforms, allowing you to easily deploy websites, databases, web applications, and 280+ one-click services to your own server. It works on a Docker-based runtime with built-in reverse proxy, automated deployments via GitHub webhooks, and extensive template support.
This post will walk you through my exact setup for achieving production-ready, scalable, and private deployments for a fraction of the cost of managed platforms.
🏗️ Infrastructure Overview
To ensure robustness and separation of concerns, we will use a two-server architecture:
Purpose | Server Type (Example) | Role |
|---|---|---|
Coolify Control Panel | Hostinger KVM 2 | Runs the Coolify management UI. |
Application Server | Hostinger KVM 2 | Where your Next.js application will actually run. |
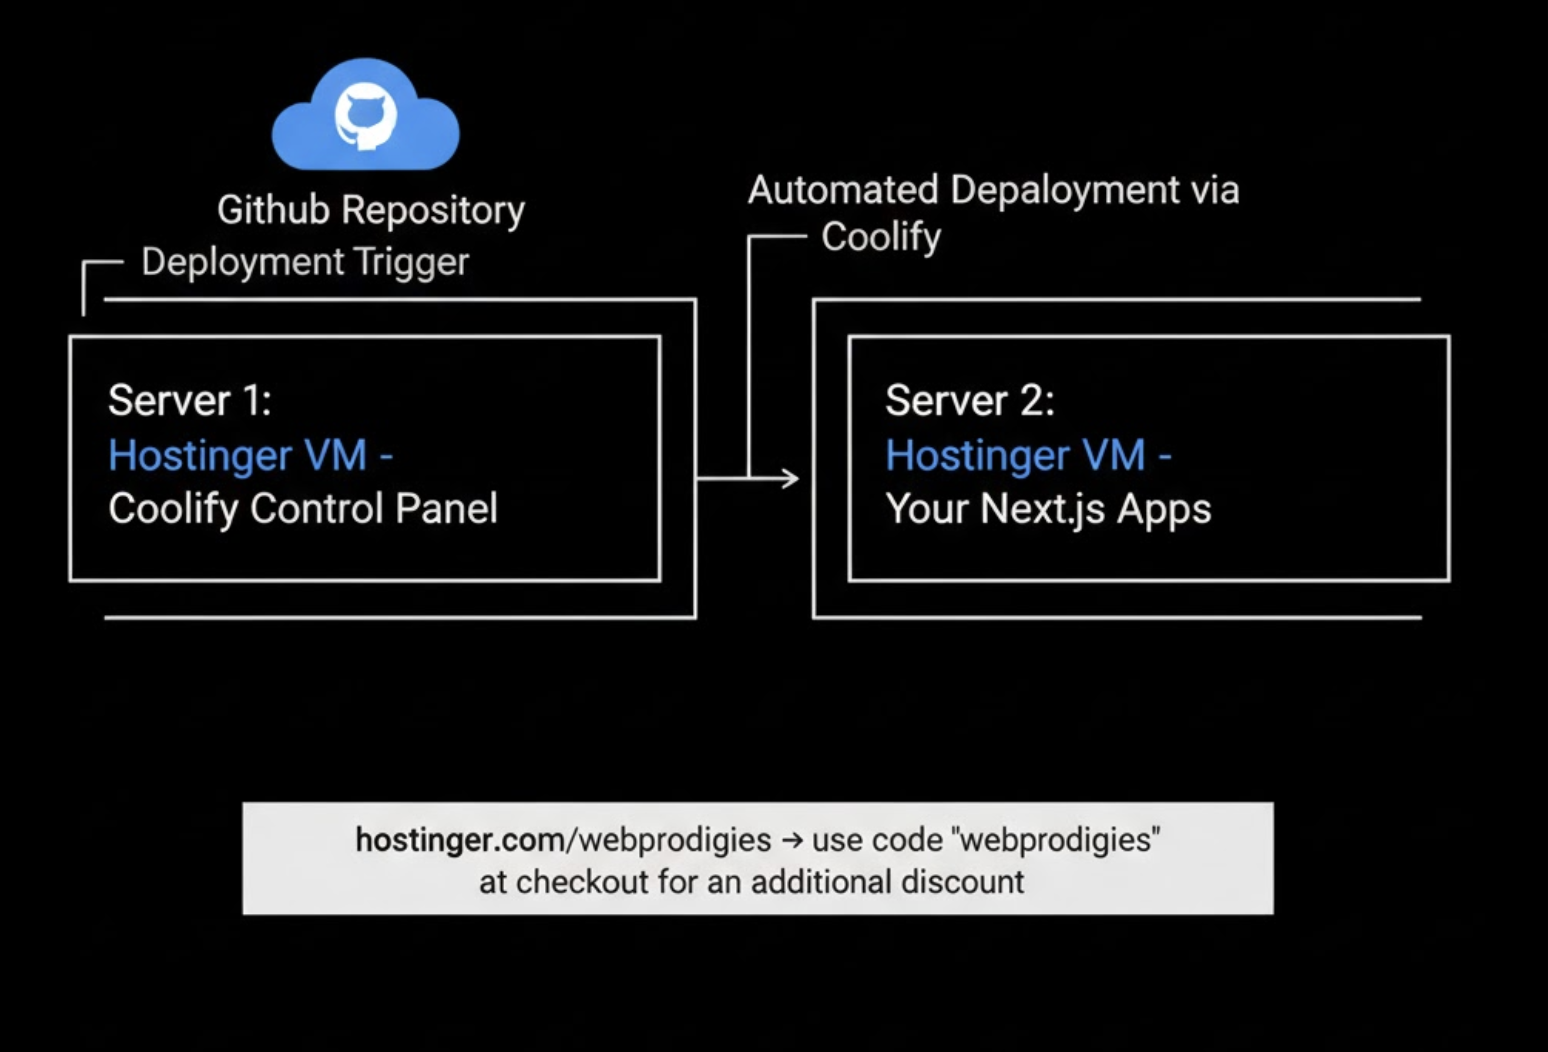
Separating these ensures that even if your application crashes or is under heavy load, your Coolify management panel remains stable and accessible.
We're using a two-server architecture. Server one runs Coolify, which is your deployment control panel with a clean web interface. Server two runs your actual Next.js applications. This separation means when your app crashes or gets hit with traffic, your control panel stays online and accessible.
This is how professional infrastructure works. Big companies separate their control plane from their application layer. We're doing the same thing, but configured specifically for Next.js developers who want control without complexity.
Total cost can be under $7 per month depending on which server plans you choose and how many you choose.
You can host unlimited projects using this method.
What You Need to Get Started
You'll need two VPS servers from Hostinger. Head over to hostinger.com/webprodigies to get started. You'll also need a GitHub account for your code repositories and a domain name from Cloudflare (I prefer Cloudflare).
If you have a domain from a provider other than Cloudflare, transfer it by following this guide: Transfer your domain to Cloudflare.
Basic terminal knowledge helps, but you don't need to be a DevOps expert. If you've deployed a Next.js app before using any method, you have enough knowledge to follow this guide.
Plan for about 45 minutes to complete the initial setup. After that, deploying new apps takes less than 5 minutes each, and you rarely have to think about the infrastructure again.
Choosing Your Server Plans
Server size matters for performance and cost. To keep things simple, get these:
Server costs:
One KVM 2 for the Coolify panel
One KVM 2 or KVM 4 for your web application
Pick two plans here that fit your needs. Most developers start with KVM 2 for both servers, giving you all you need to deploy your SaaS and accept customers.
Part 1: Setting Up Your Servers
Purchasing and Configuring Your VPS Instances
During checkout, I recommend the 24‑month plan because it gives you the most value. Shorter terms usually cost more over time.
After purchase, both servers appear in your Hostinger dashboard. Click Setup to start onboarding for each server.
Install Coolify on one server, and install Ubuntu on the other. Continue through the onboarding steps.
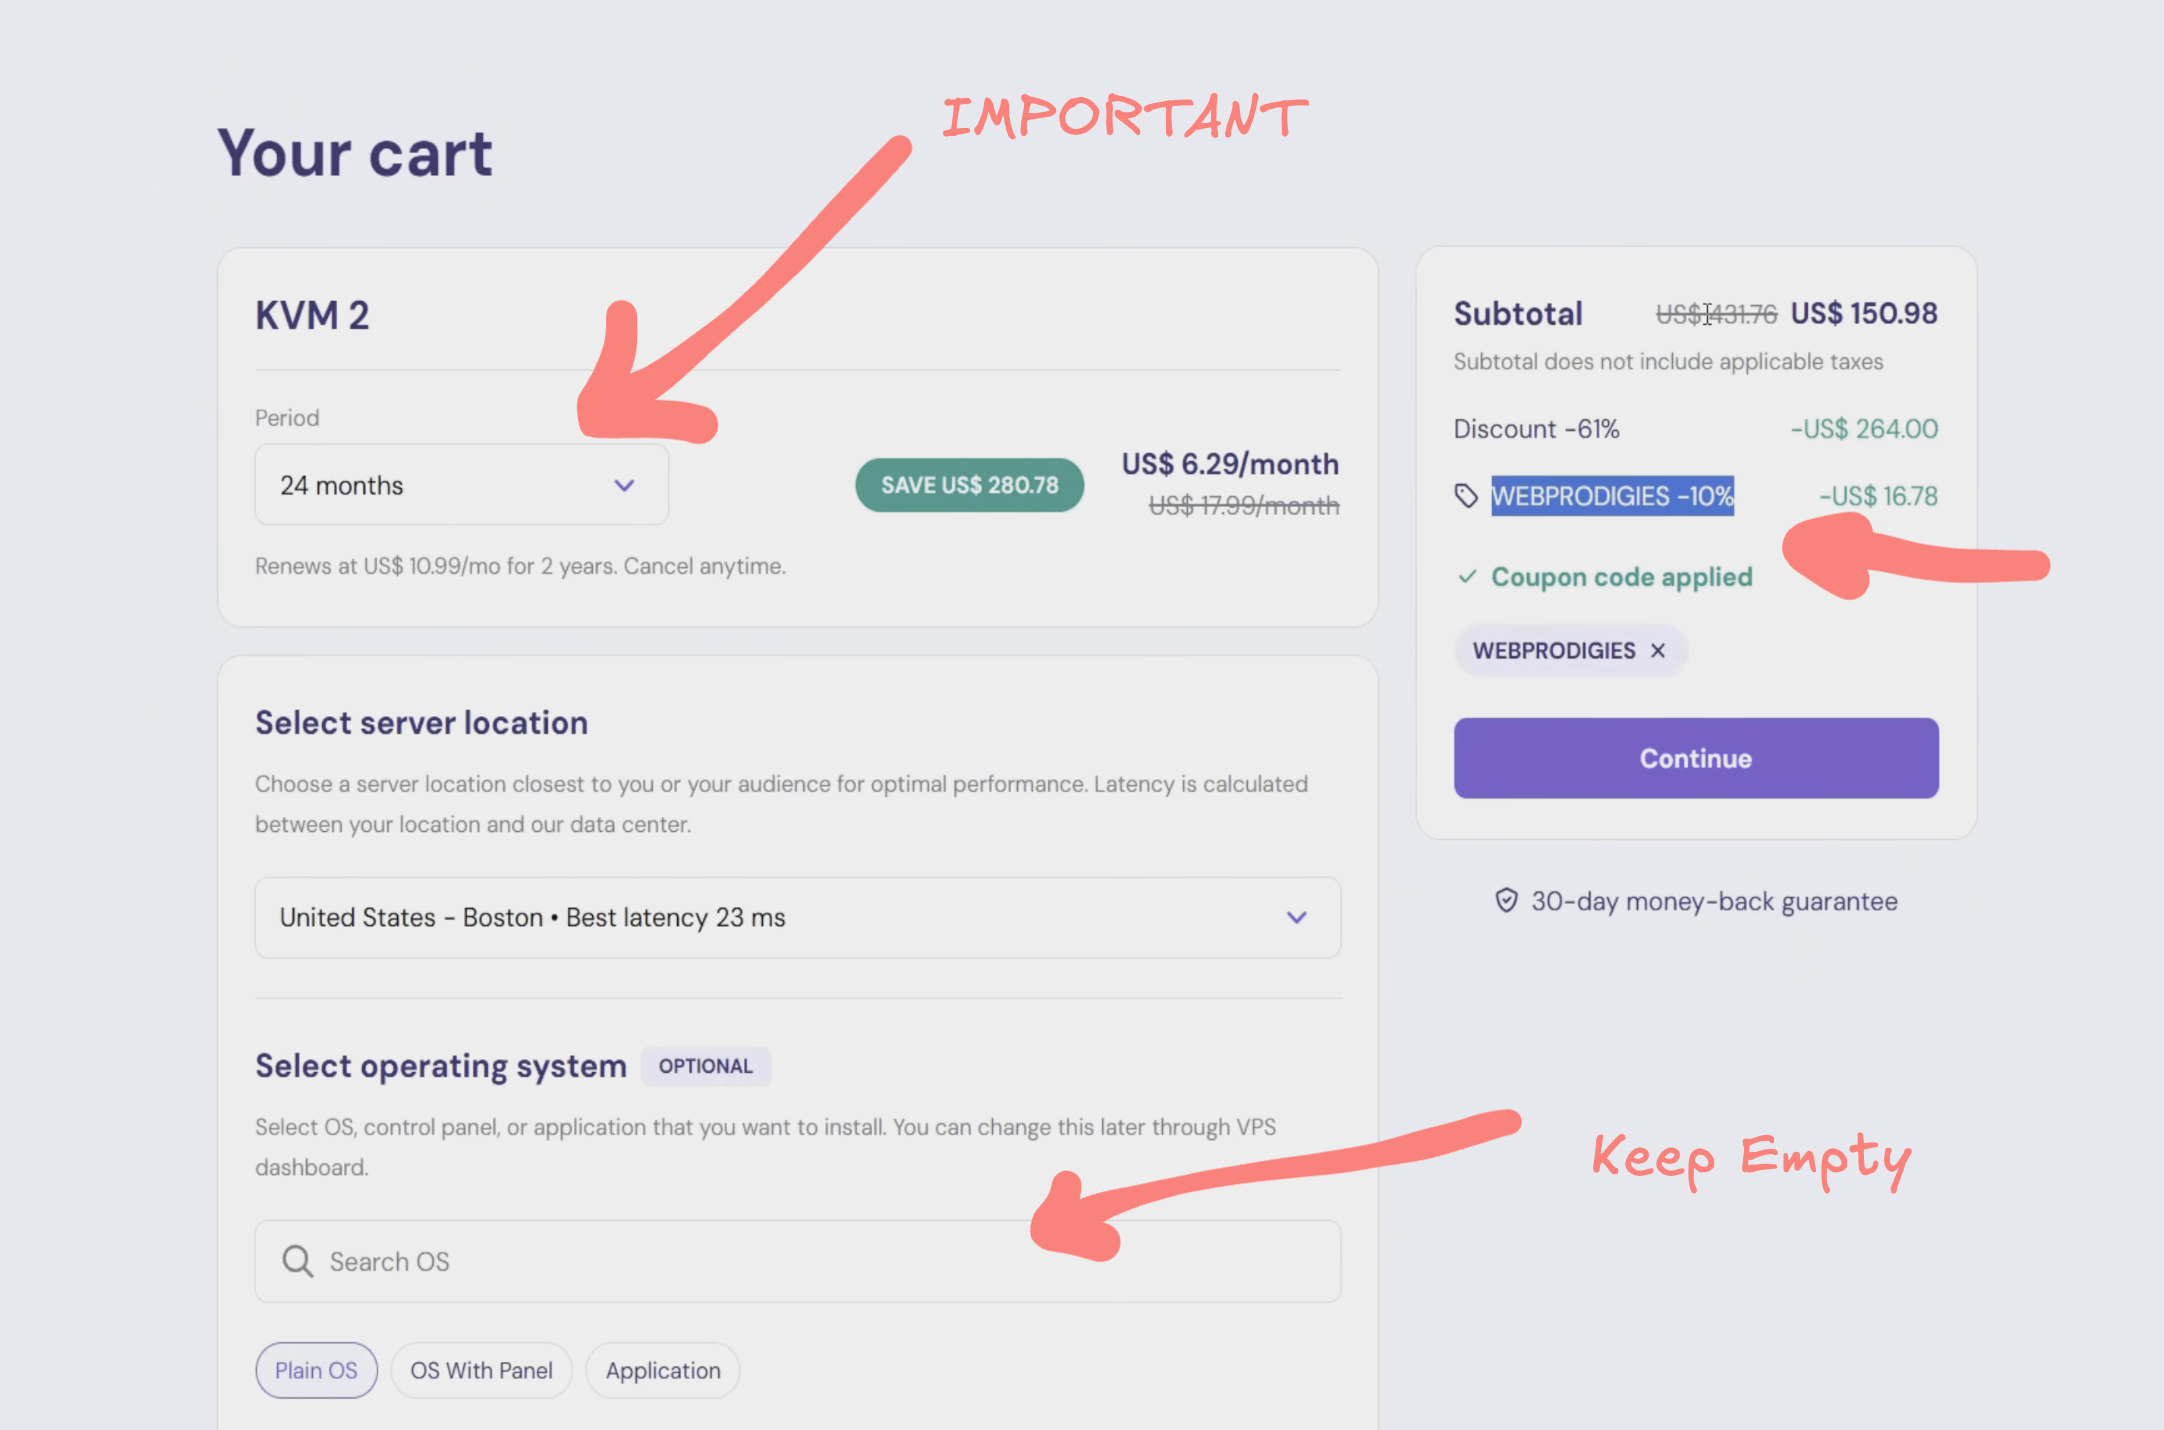
Make sure you create a strong root password when prompted and store it somewhere secure. You’ll need this for SSH.
Tip: From the Hostinger dashboard, you can also install the OS directly by clicking “Manage” on the VM and choosing your OS.
The automated installation configures Docker, sets up all necessary services, and gets Coolify running on port 8000. When it finishes, you have a fully functional deployment platform ready to manage your applications. Make sure port 8000 is open in your firewall settings if you don’t see it already.
Click “Manage panel” and it should take you to Coolify. If you see the Coolify UI, you’re on the right track—great job!
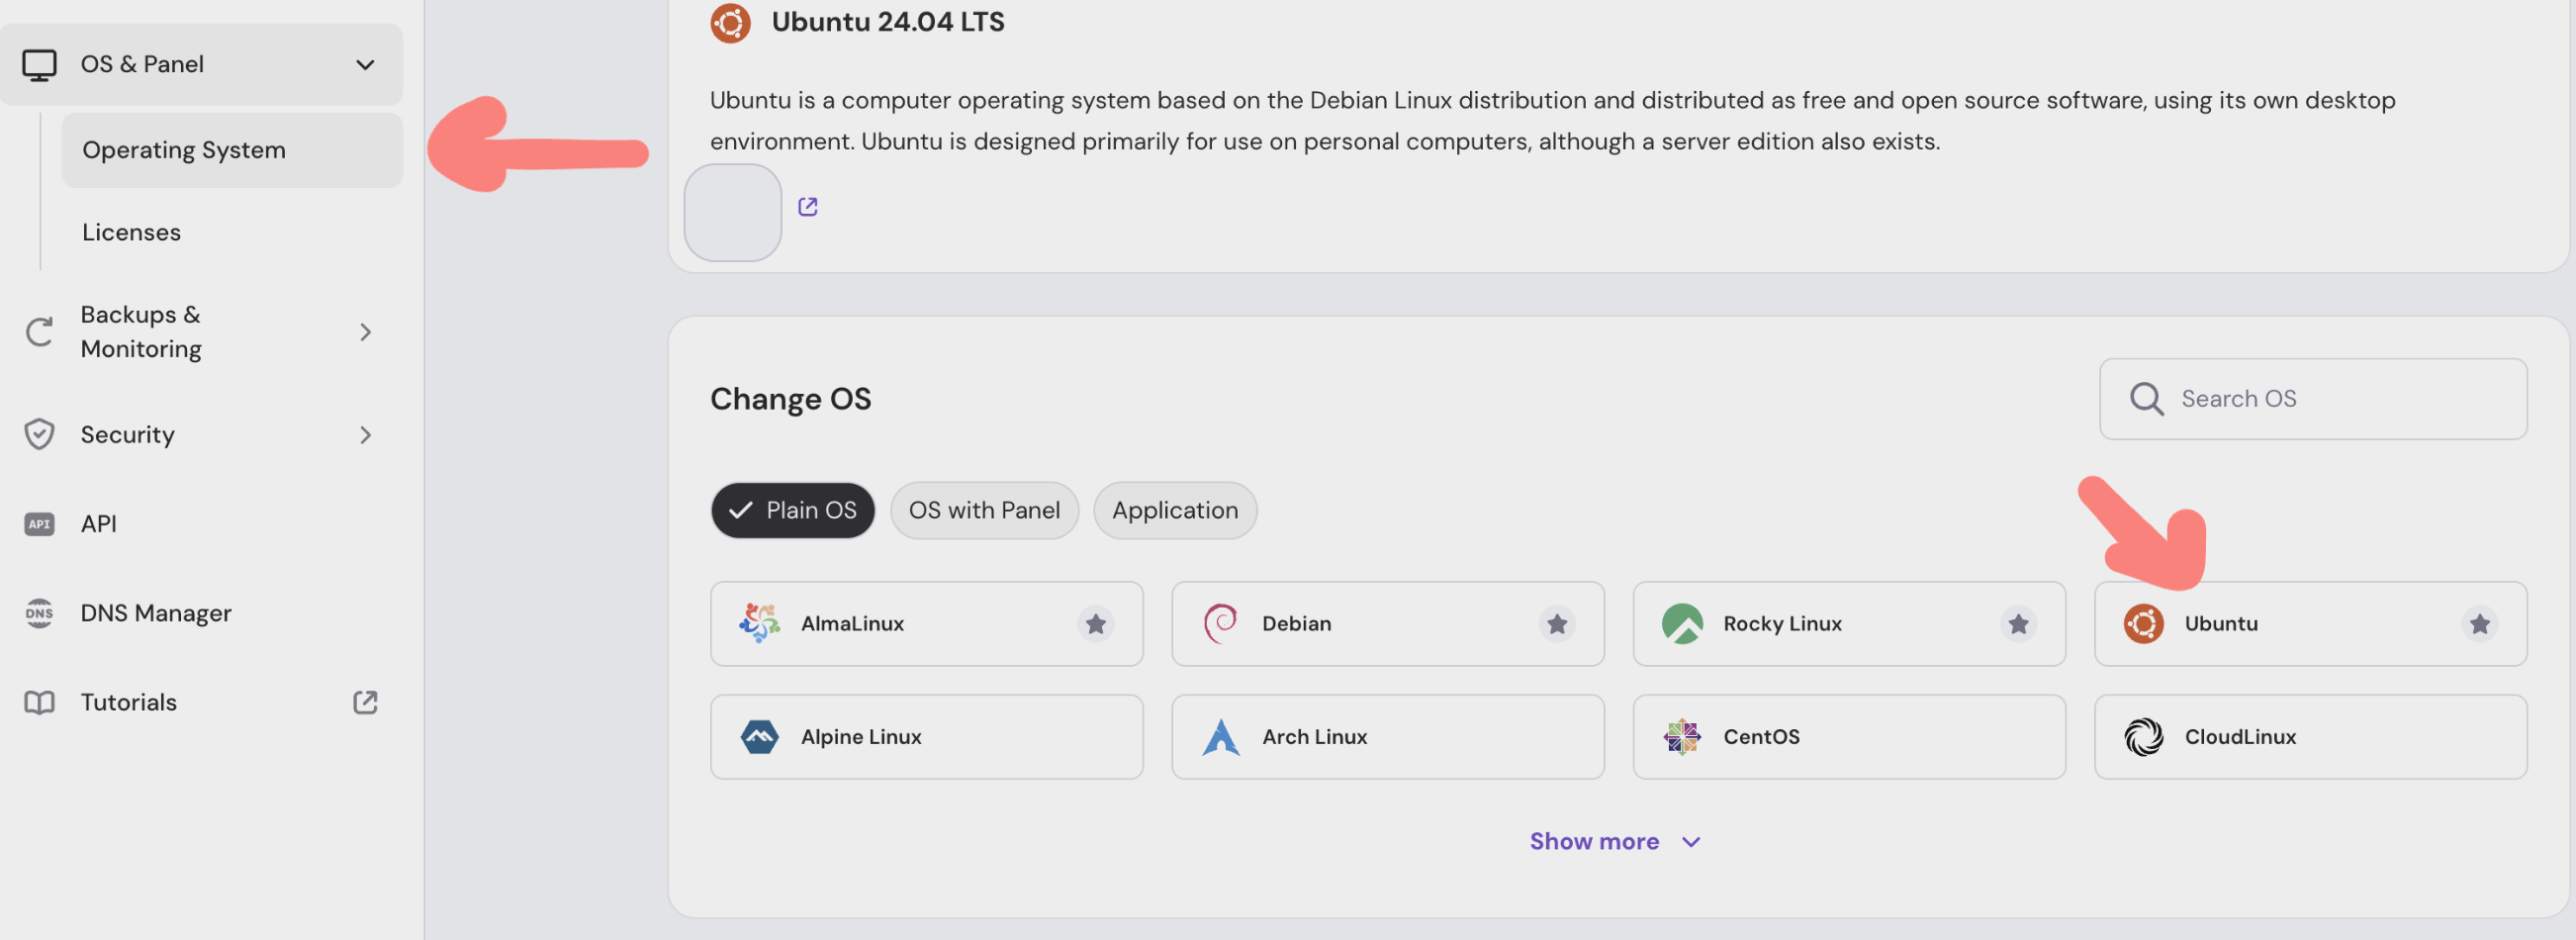
Installing Ubuntu on Server Two
Your second server runs a clean Ubuntu installation. This is where your actual Next.js applications will live.
If you already installed Ubuntu during onboarding you can skip this. Otherwise:
Go to your second VPS in the Hostinger dashboard.
Navigate to OS & Panel → Operating System.
Select Ubuntu. Do not select the Coolify option for this server.
Set a different root password from your first server for security.
Click to install or reinstall the OS if needed. This usually takes 2–5 minutes.
Configuring Firewall Rules
Security starts with properly configured firewalls. We’ll open specific ports for web traffic while keeping everything else locked down.
Add these ports for both servers:
Port 80 for HTTP traffic
Port 443 for HTTPS traffic
Port 22 for SSH access
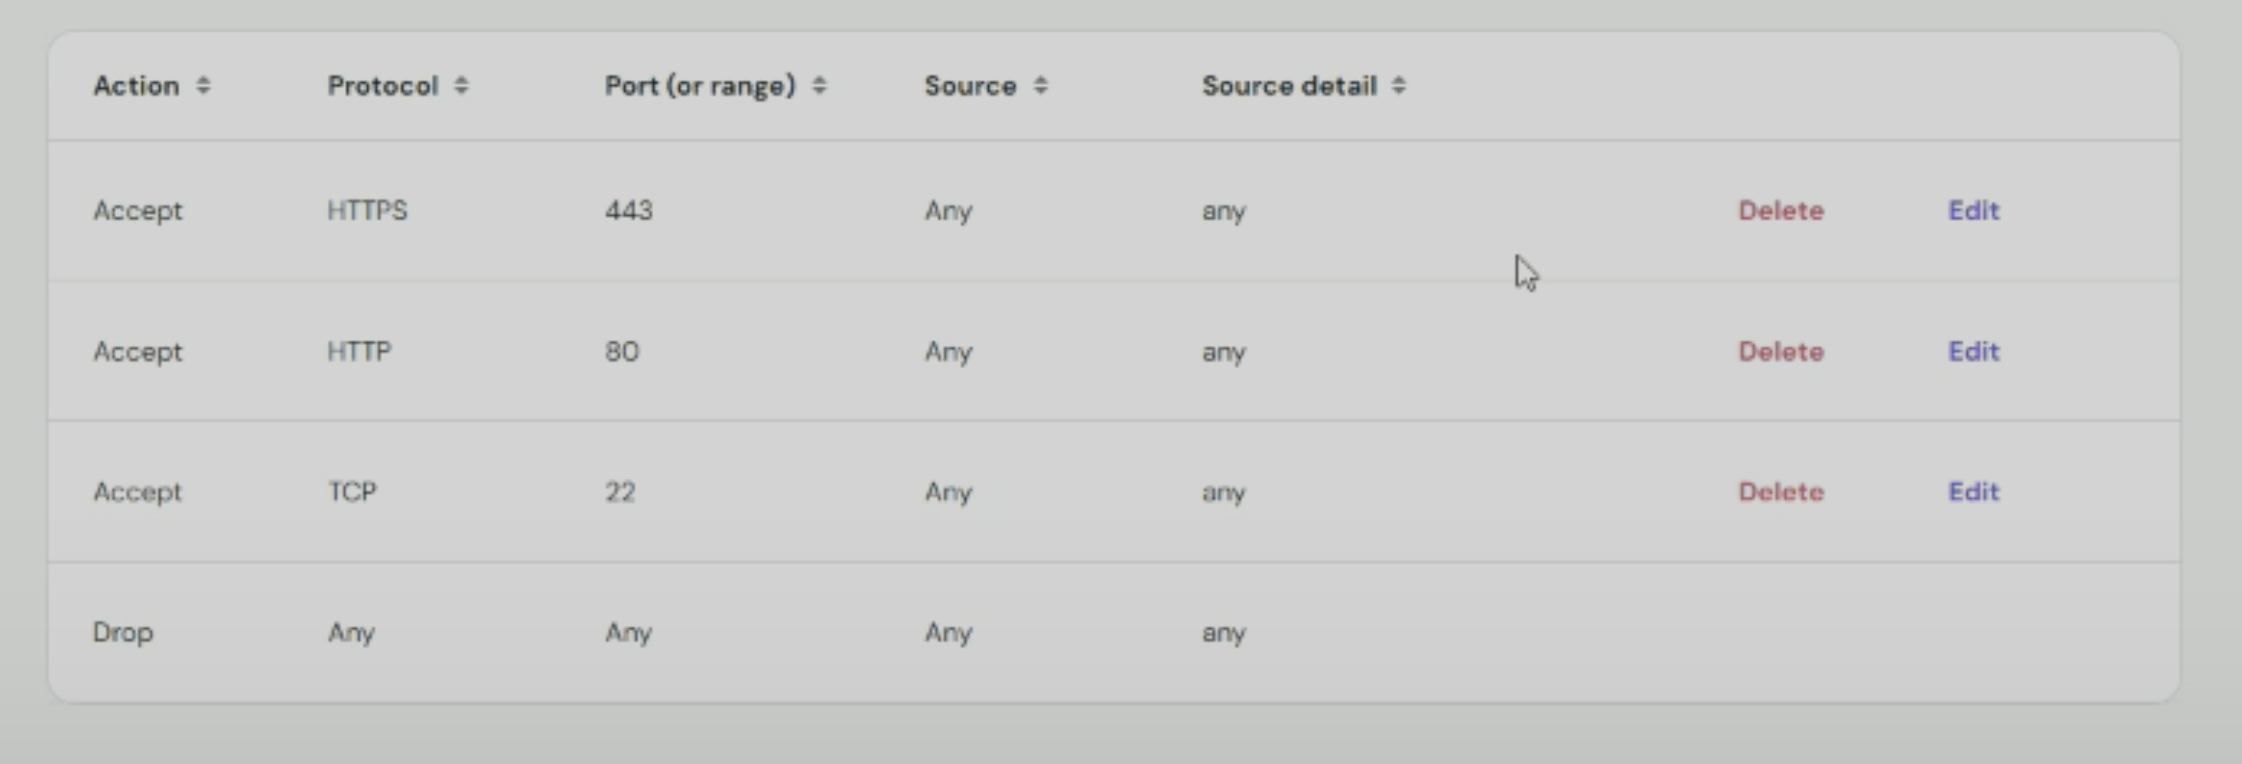
For Server 1 (Coolify) only, temporarily add Port 8000. This lets you access the Coolify dashboard for initial setup. We’ll close this port later after setting a proper domain for better security.
Steps:
In your Hostinger dashboard, go to Security → Firewall for your first server.
Create a new firewall configuration. Name it something clear like "Production Firewall".
Add the ports listed above and apply the firewall to both servers.
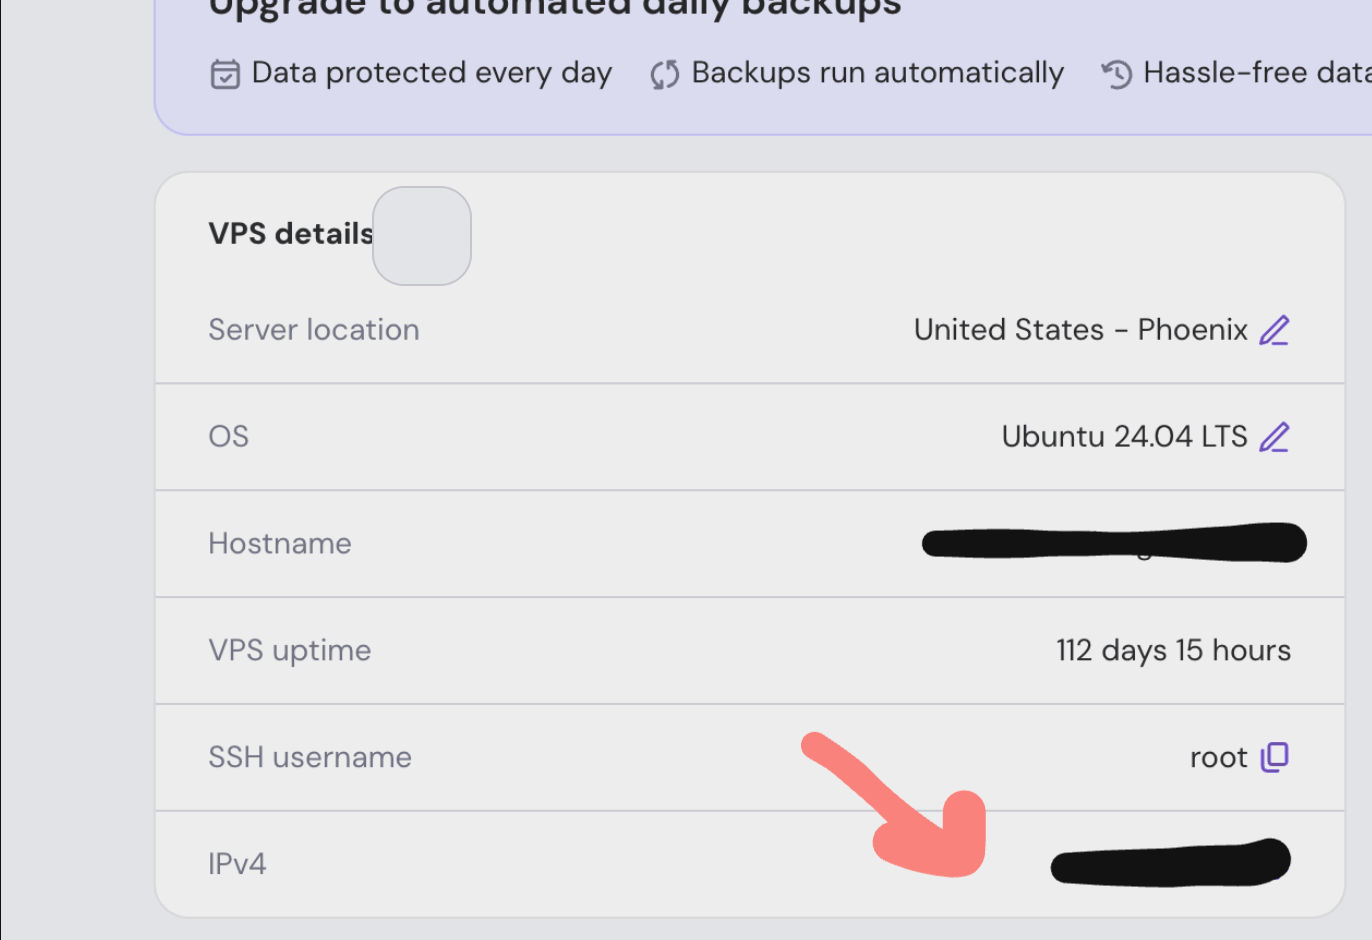
Recording Your Server IP Addresses
You'll use these IP addresses throughout the setup, so save them somewhere accessible.
On your first server, copy the IP address from the server details and label it
COOLIFY_IP. Example:COOLIFY_IP: xxx.xx.xx.xxOn your second server, copy its IP and label it
APPS_IP. Example:APPS_IP: xxx.xx.xx.xx
Keep this information handy. You'll reference these IPs multiple times as we configure Coolify and set up your domain names.
✅ Prerequisites
Before starting this 45-60 minute setup, make sure you have:
Two VPS Instances: Installed with the recommended OS (Coolify OS for Server 1, Ubuntu 22.04 for Server 2).
A GitHub Account: With your application repository.
A Domain Name: (Strongly recommended for SSL).
Basic understanding of SSH/Terminal.
Note: We’re using Hostinger here because it offers a ready-to-use Coolify template that automates installation. If you’re on Hostinger, there’s an optional public discount code — “webprodigies” — for an additional discount. This does not change any of the steps below.
Quick start on Hostinger
Choose a KVM VPS (KVM 2 works great)
Select the Coolify template during setup
You’ll get a pre-configured Coolify panel in minutes
Get Hostinger VPS with discount · Code: webprodigies
⚙️ Coolify Installation and Setup
You can install Coolify in two ways:
Pre-installed OS: Select an operating system that comes pre-installed with Coolify on Hostinger. In this case, Coolify will be automatically configured during system setup.
Manual Setup: If you prefer manual installation, run the following official installation script:
curl -fsSL <https://cdn.coollabs.io/coolify/install.sh> | bash
Note: Coolify runs on port 8000 by default. Make sure to open port 8000 in your firewall settings (e.g., on Hostinger or your cloud provider).
You can then access the dashboard at:
http://your-server-ip:8000
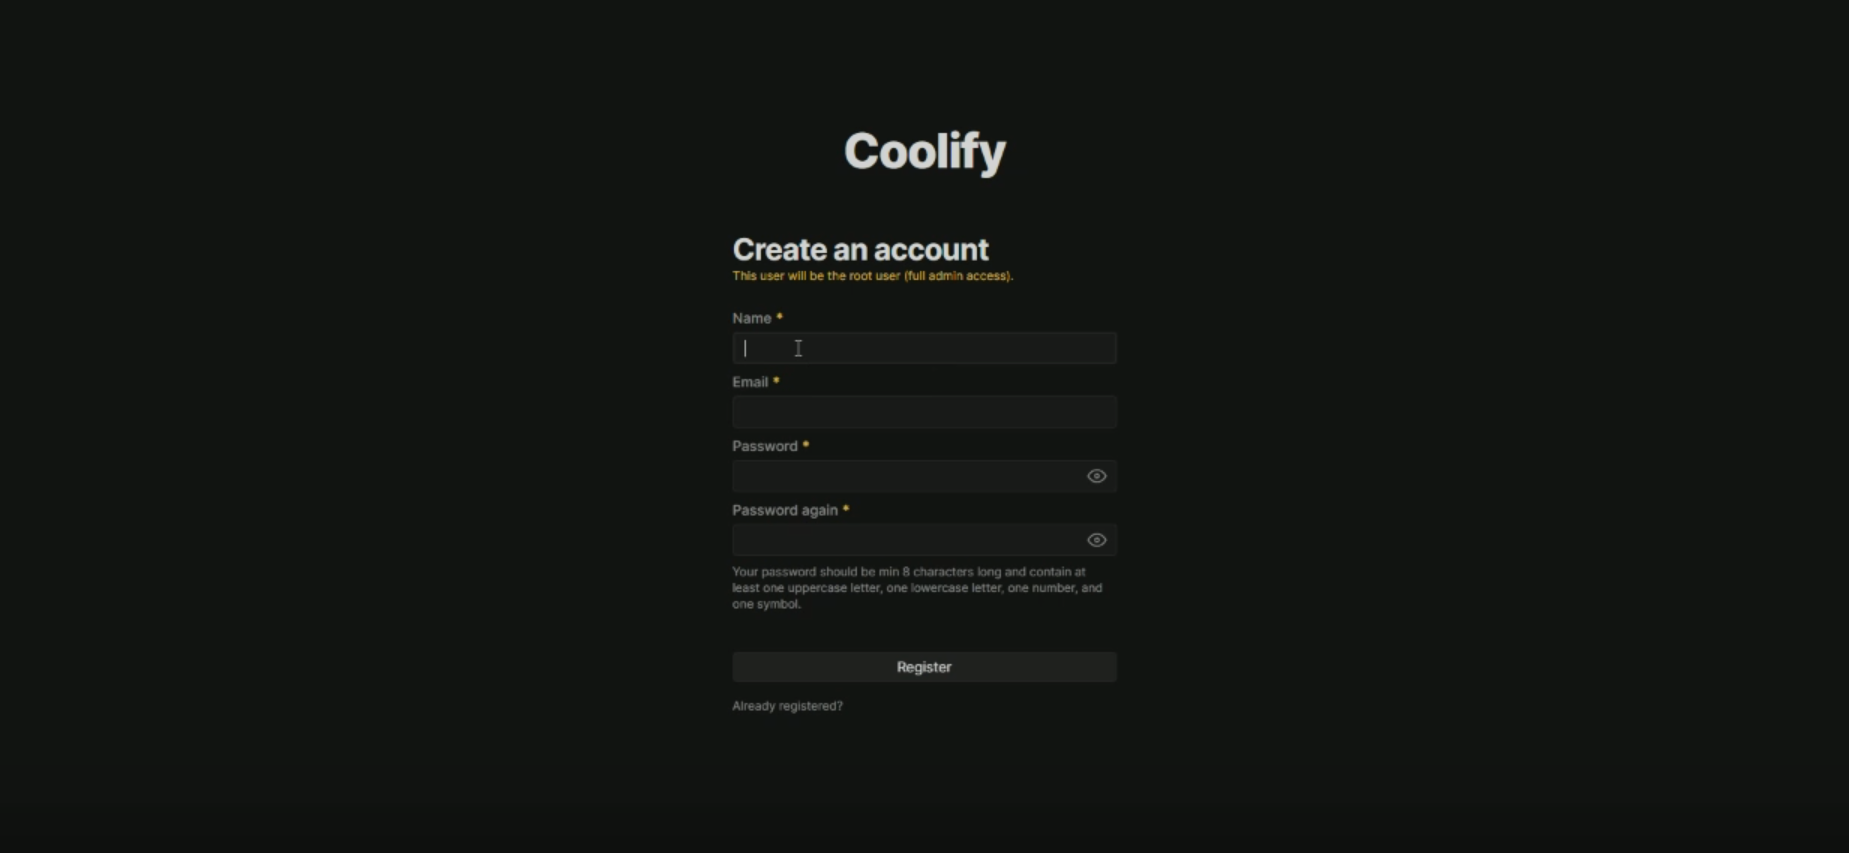
After setting up the Coolify server, you open the http://your-server-ip:8000 link, and you will see the screen to create an account
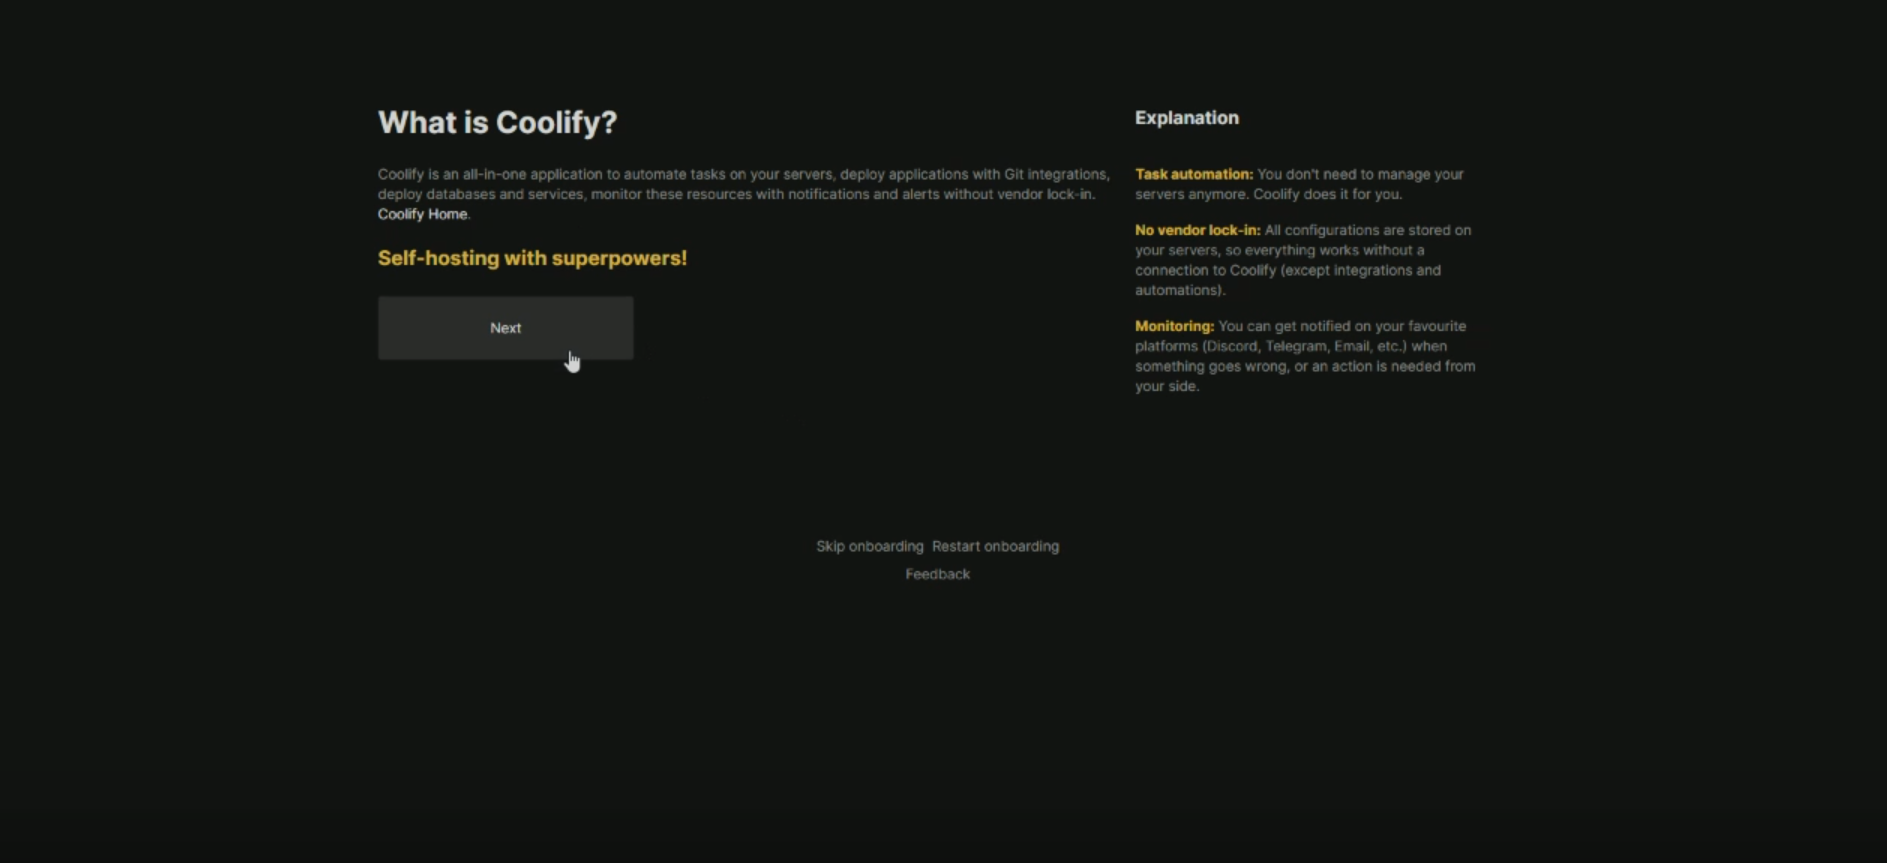
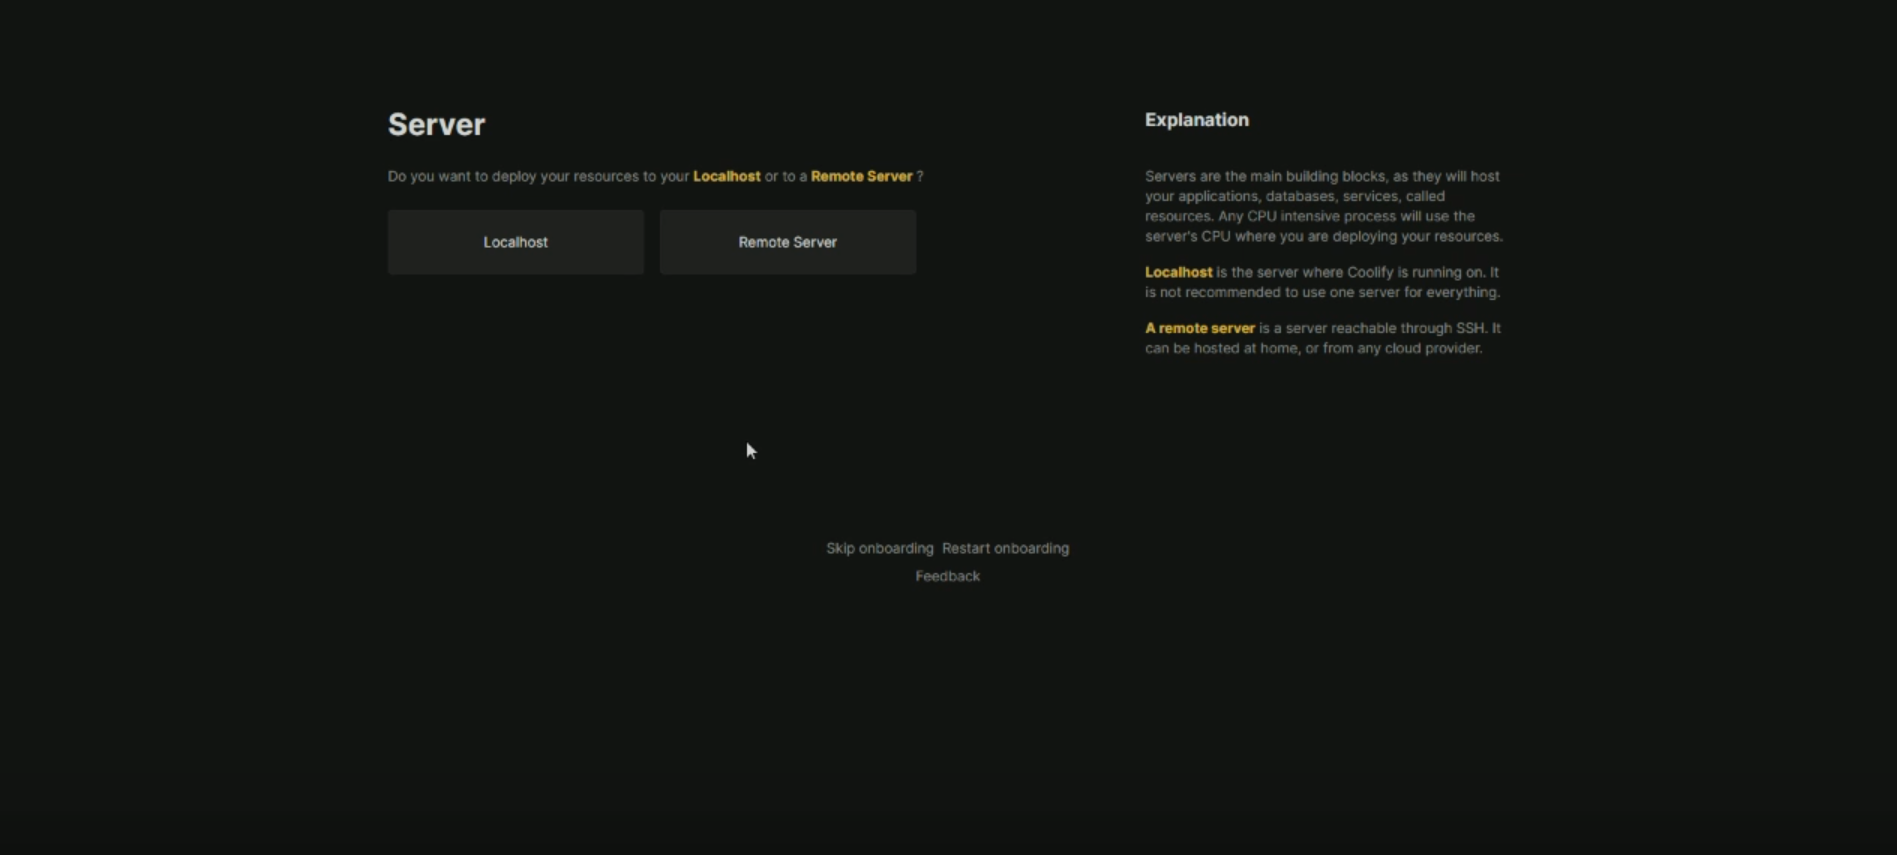
Now, after the above screen, Coolify provides two options for deploying anything you can deploy on your same VPS on which Coolify is deployed, or you can deploy on another Hostinger VPS. The more preferred way is to deploy on another Hostinger VPS. Why? Because if ever your project overloads or crashes, then your Coolify server will remain in a running state. So I chose two VPS
km2 - for my Coolify
km42 for deploying my prod and staging environment
Connect the Remote Application Server
Choose Remote Server
In Coolify, start by selecting Remote Server as the deployment method.
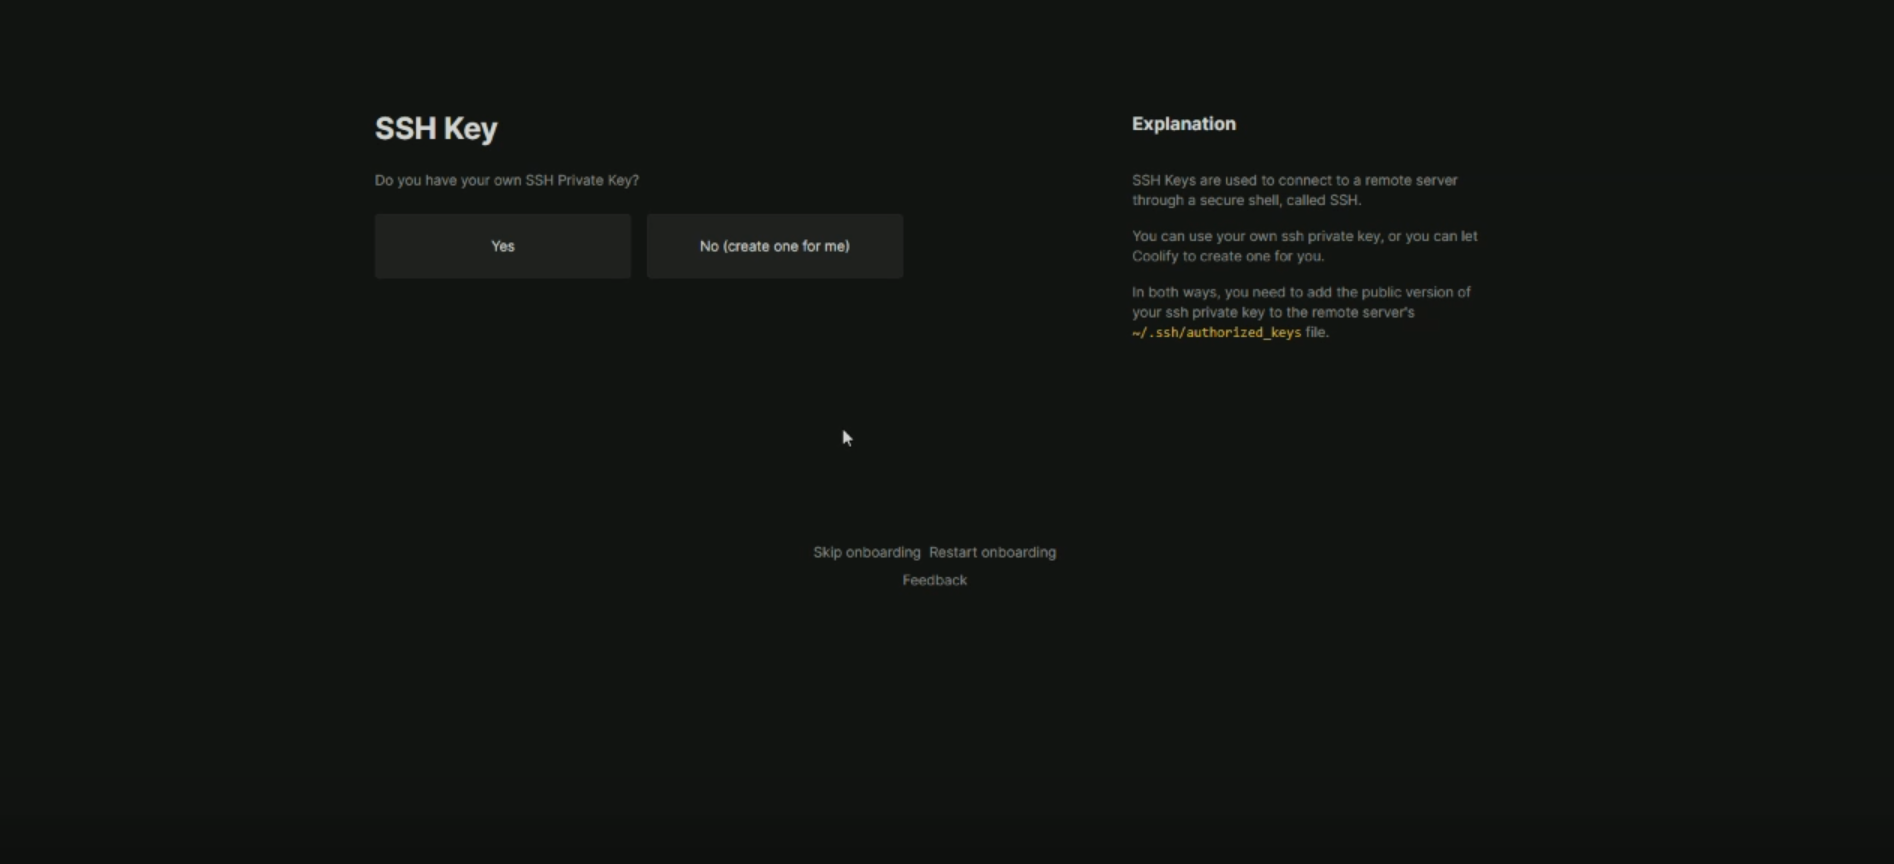
Add or Create SSH Key
If you already have an SSH key, select and use it.
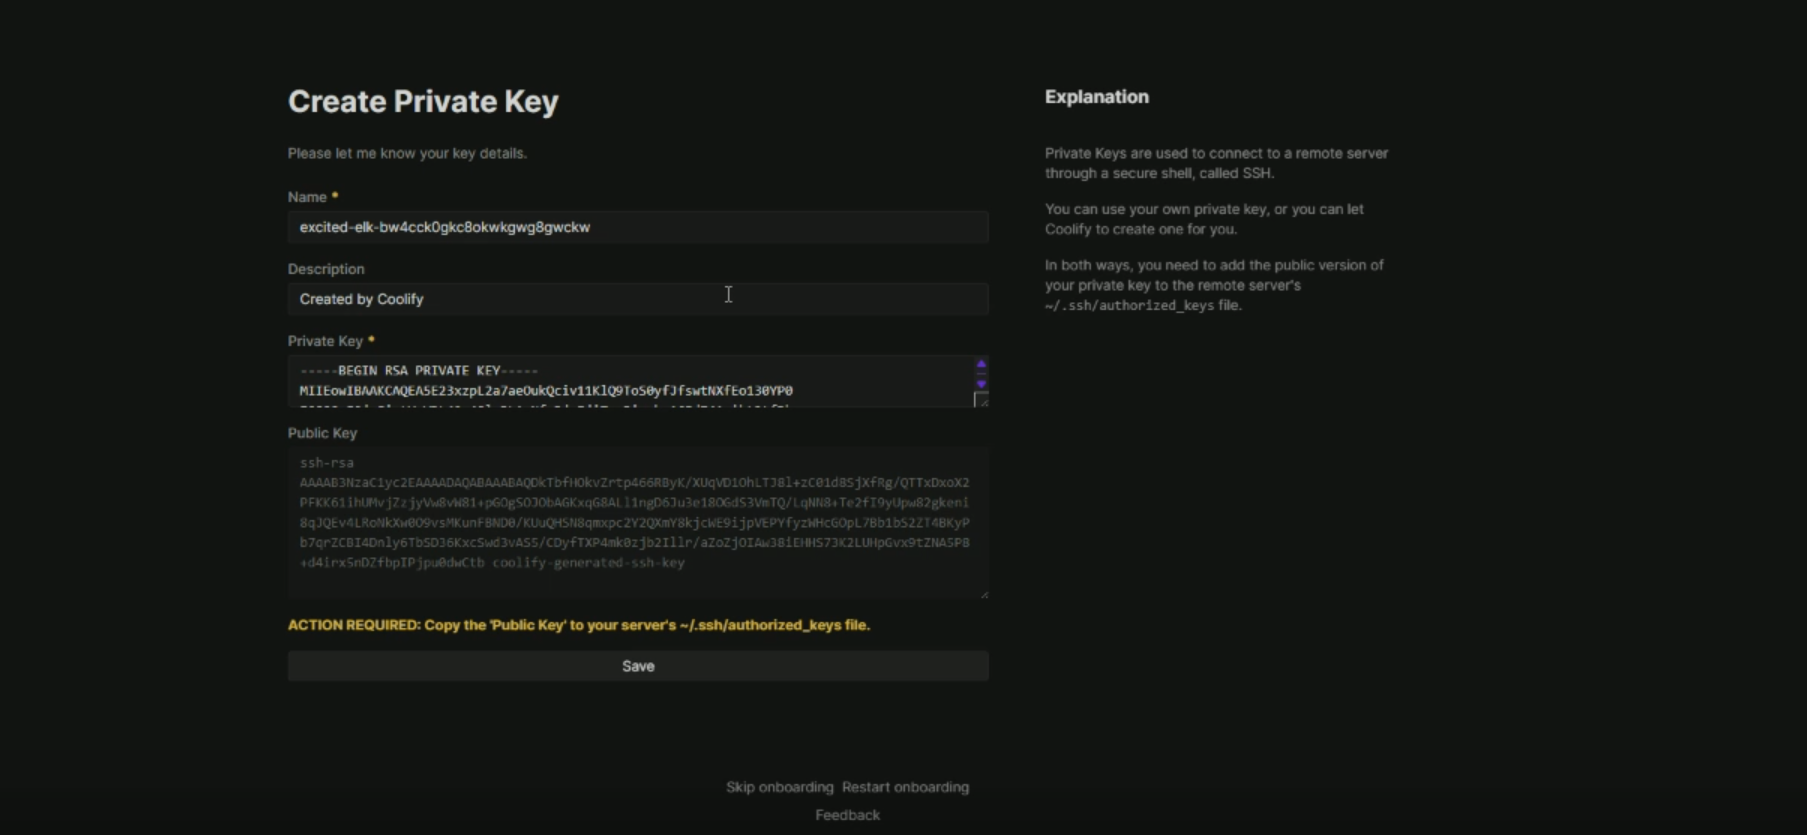
If not, generate a new SSH key in Coolify.
Log in to Your Hostinger VPS
Use SSH to access your VPS terminal.
Navigate to the SSH Directory
cd ~/.sshAdd the Public Key to Authorized Keys
Open the
authorized_keysfile:vim authorized_keysPaste the public key from Coolify (not the private key).
Save and exit Vim.
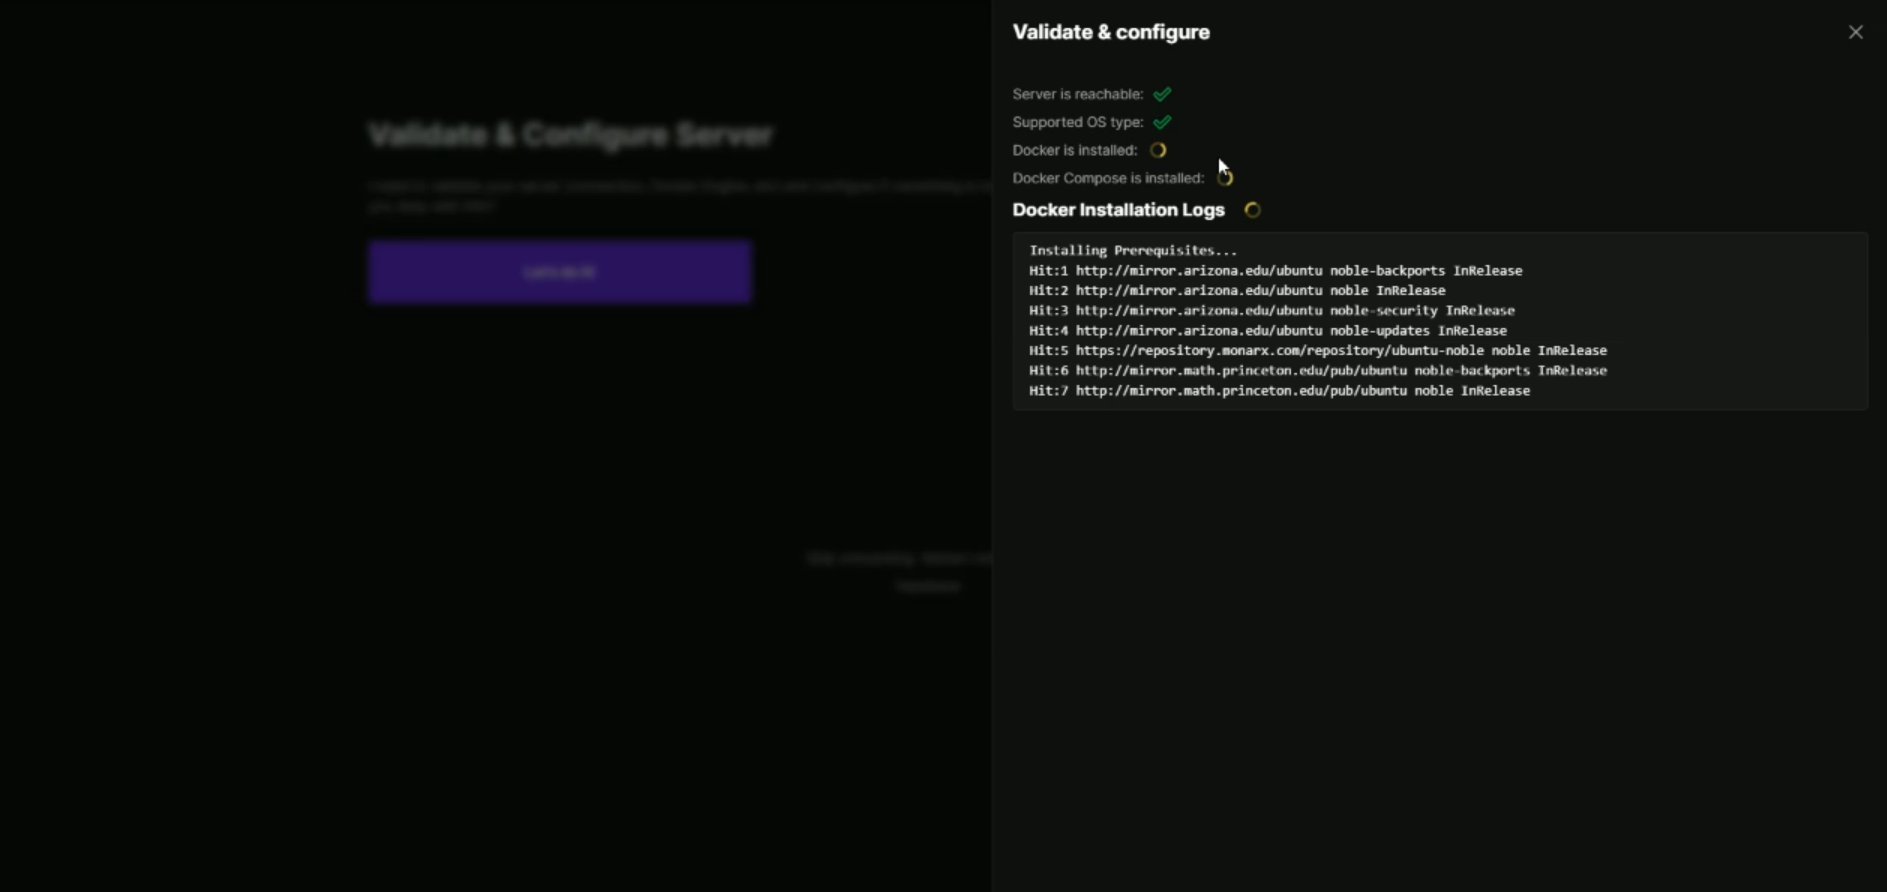
Verify Key in Coolify
Coolify will automatically validate the SSH key once it’s added to the server.
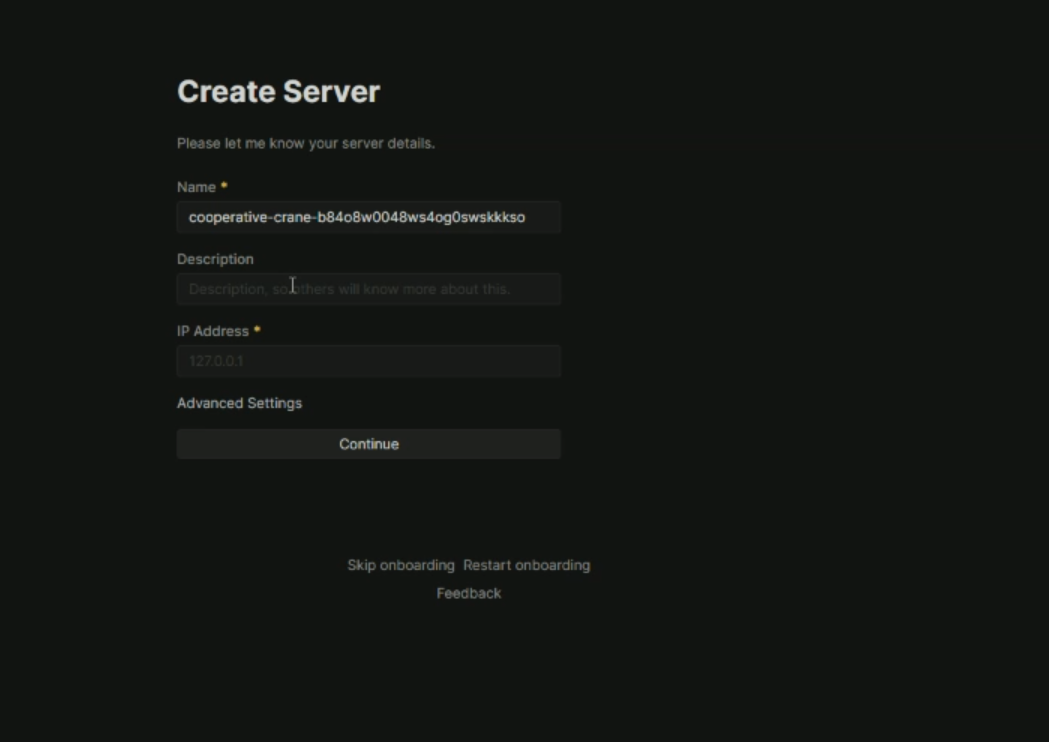
Enter VPS IP Address
Provide your Hostinger VPS public IP in Coolify to complete the connection.
How to configure Coolify domain
A. Coolify Panel Domain
Go to Settings —> Domain in Coolify.
Enter your desired panel domain (e.g.,
coolify.yourdomain.com).Create an A record in your DNS pointing this domain to Server 1's IP address (Coolify control panel).
Coolify will automatically handle the SSL request.3 Once active, you can close port 8000 on Server 1's public firewall.
B. Application Wildcard Domain
To allow new applications to get automatic subdomains (e.g., app-a.yourdomain.com, app-b.yourdomain.com), configure a wildcard:
Go to Servers —> Select your Remote Application Server (Server 2).
Add a wildcard domain (e.g.,
.yourdomain.com).Add a matching Wildcard A record in your DNS, pointing
.yourdomain.comto Server 2's IP address.
🐳 Prepare the Next.js Application
Coolify works best with containerized applications. For a Next.js app, you need to use the standalone output and provide a Dockerfile.
# syntax=docker.io/docker/dockerfile:1

FROM node:20-alpine AS base

FROM base AS deps
RUN apk add --no-cache libc6-compat
WORKDIR /app

COPY package.json yarn.lock* package-lock.json* pnpm-lock.yaml* .npmrc* ./
RUN \\
  if [ -f yarn.lock ]; then yarn --frozen-lockfile; \\
  elif [ -f package-lock.json ]; then npm ci; \\
  elif [ -f pnpm-lock.yaml ]; then corepack enable pnpm && pnpm i --frozen-lockfile; \\
  else echo "Lockfile not found." && exit 1; \\
  fi

FROM base AS builder
WORKDIR /app
COPY --from=deps /app/node_modules ./node_modules
COPY . .

# Accept build arguments for NEXT_PUBLIC_ environment variables
# These are embedded into the client-side JavaScript bundle at build time
ARG NEXT_PUBLIC_SUPABASE_URL
ARG NEXT_PUBLIC_SUPABASE_PUBLISHABLE_OR_ANON_KEY
ARG NEXT_PUBLIC_APP_URL
ARG NEXT_PUBLIC_BASE_URL
ARG NEXT_PUBLIC_CLARITY_PROJECT_ID
ARG NEXT_PUBLIC_MOCHI_LAUNCH_DATE
ARG NEXT_PUBLIC_STRIPE_PUBLISHABLE_KEY
ARG NEXT_PUBLIC_FIGMA_WORK
ARG NEXT_PUBLIC_POLAR_PORTAL_URL
ARG NEXT_PUBLIC_TELEGRAM_LINK
ARG NEXT_PUBLIC_MUX_VIDEO_URL
ARG NEXT_PUBLIC_DUMMY_LOOM_VIDEO
ARG NEXT_PUBLIC_SITE_URL

# Make them available as environment variables during build
ENV NEXT_PUBLIC_SUPABASE_URL=$NEXT_PUBLIC_SUPABASE_URL
ENV NEXT_PUBLIC_SUPABASE_PUBLISHABLE_OR_ANON_KEY=$NEXT_PUBLIC_SUPABASE_PUBLISHABLE_OR_ANON_KEY
ENV NEXT_PUBLIC_APP_URL=$NEXT_PUBLIC_APP_URL
ENV NEXT_PUBLIC_BASE_URL=$NEXT_PUBLIC_BASE_URL
ENV NEXT_PUBLIC_CLARITY_PROJECT_ID=$NEXT_PUBLIC_CLARITY_PROJECT_ID
ENV NEXT_PUBLIC_MOCHI_LAUNCH_DATE=$NEXT_PUBLIC_MOCHI_LAUNCH_DATE
ENV NEXT_PUBLIC_STRIPE_PUBLISHABLE_KEY=$NEXT_PUBLIC_STRIPE_PUBLISHABLE_KEY
ENV NEXT_PUBLIC_FIGMA_WORK=$NEXT_PUBLIC_FIGMA_WORK
ENV NEXT_PUBLIC_POLAR_PORTAL_URL=$NEXT_PUBLIC_POLAR_PORTAL_URL
ENV NEXT_PUBLIC_TELEGRAM_LINK=$NEXT_PUBLIC_TELEGRAM_LINK
ENV NEXT_PUBLIC_MUX_VIDEO_URL=$NEXT_PUBLIC_MUX_VIDEO_URL
ENV NEXT_PUBLIC_DUMMY_LOOM_VIDEO=$NEXT_PUBLIC_DUMMY_LOOM_VIDEO
ENV NEXT_PUBLIC_SITE_URL=$NEXT_PUBLIC_SITE_URL

RUN \\
  if [ -f yarn.lock ]; then yarn prisma generate && yarn build; \\
  elif [ -f package-lock.json ]; then npx prisma generate && npm run build; \\
  elif [ -f pnpm-lock.yaml ]; then corepack enable pnpm && pnpm prisma generate && pnpm run build; \\
  else echo "Lockfile not found." && exit 1; \\
  fi

FROM base AS runner
WORKDIR /app

ENV NODE_ENV=production
ENV PORT=3000
ENV HOSTNAME="0.0.0.0"

# ✅ Install curl in the final image for healthcheck
RUN apk add --no-cache curl

RUN addgroup --system --gid 1001 nodejs
RUN adduser --system --uid 1001 nextjs

COPY --from=builder /app/public ./public
COPY --from=builder --chown=nextjs:nodejs /app/.next/standalone ./
COPY --from=builder --chown=nextjs:nodejs /app/.next/static ./.next/static
COPY --from=builder /app/node_modules ./node_modules
COPY --from=builder /app/prisma ./prisma

USER nextjs

EXPOSE 3000

# ✅ Healthcheck using curl
HEALTHCHECK --interval=30s --timeout=5s --start-period=10s --retries=3 \\
  CMD curl -f <http://localhost:3000/api/health> || exit 1

CMD ["node", "server.js"]
How to use
Execute create-next-app with npm, Yarn, pnpm or bun to bootstrap the example:
npx create-next-app --example with-docker nextjs-dockeryarn create next-app --example with-docker nextjs-dockerpnpm create next-app --example with-docker nextjs-dockerbun create next-app --example with-docker nextjs-dockerUsing Docker
Install Docker on your machine.
Build your container:
# For npm, pnpm or yarn
docker build -t nextjs-docker .

# For bun
docker build -f Dockerfile.bun -t nextjs-docker .
Run your container:
docker run -p 3000:3000 nextjs-docker.
You can view your images created with docker images.
In existing projects
To add Docker support, copy Dockerfile to the project root. If using Bun, copy Dockerfile.bun instead. Then add the following to next.config.js:
// next.config.js
module.exports = {
  // ... rest of the configuration.
  output: "standalone",
};
This will build the project as a standalone app inside the Docker image.
for more info you can refer to the this Nextjs repo https://github.com/vercel/next.js/tree/canary/examples/with-docker
How to Connect Github to Coolify
Go to the Sources section.
Click Add New Source, then continue.
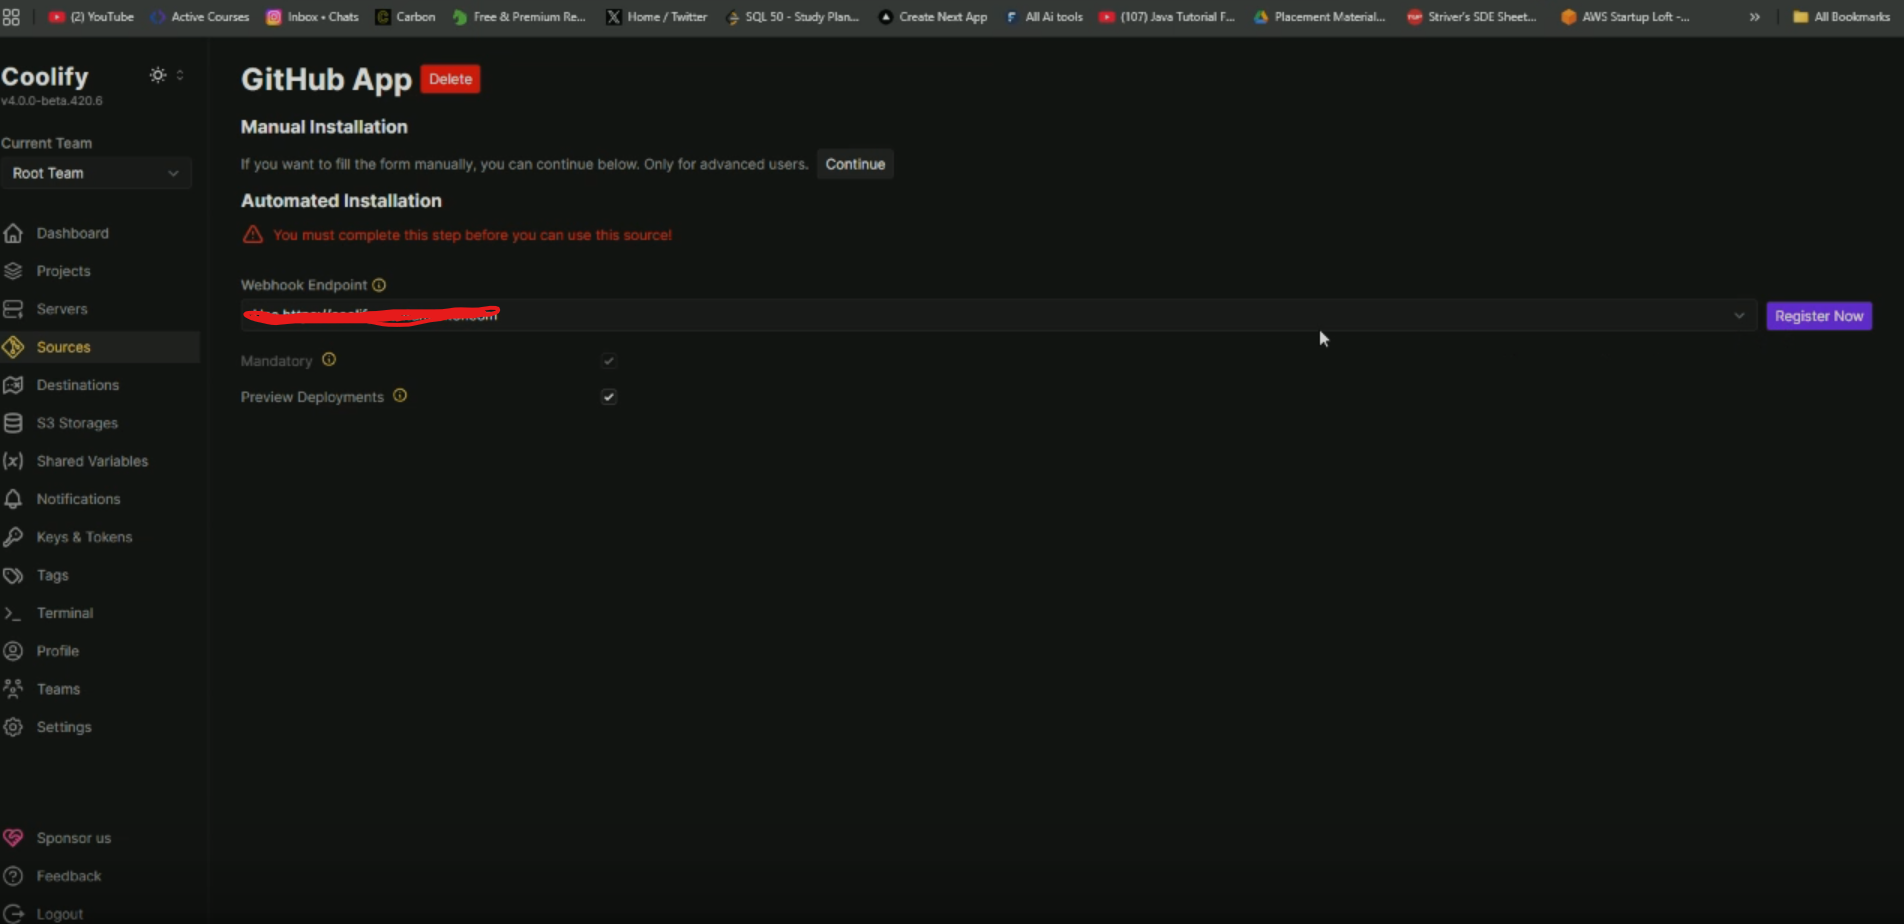
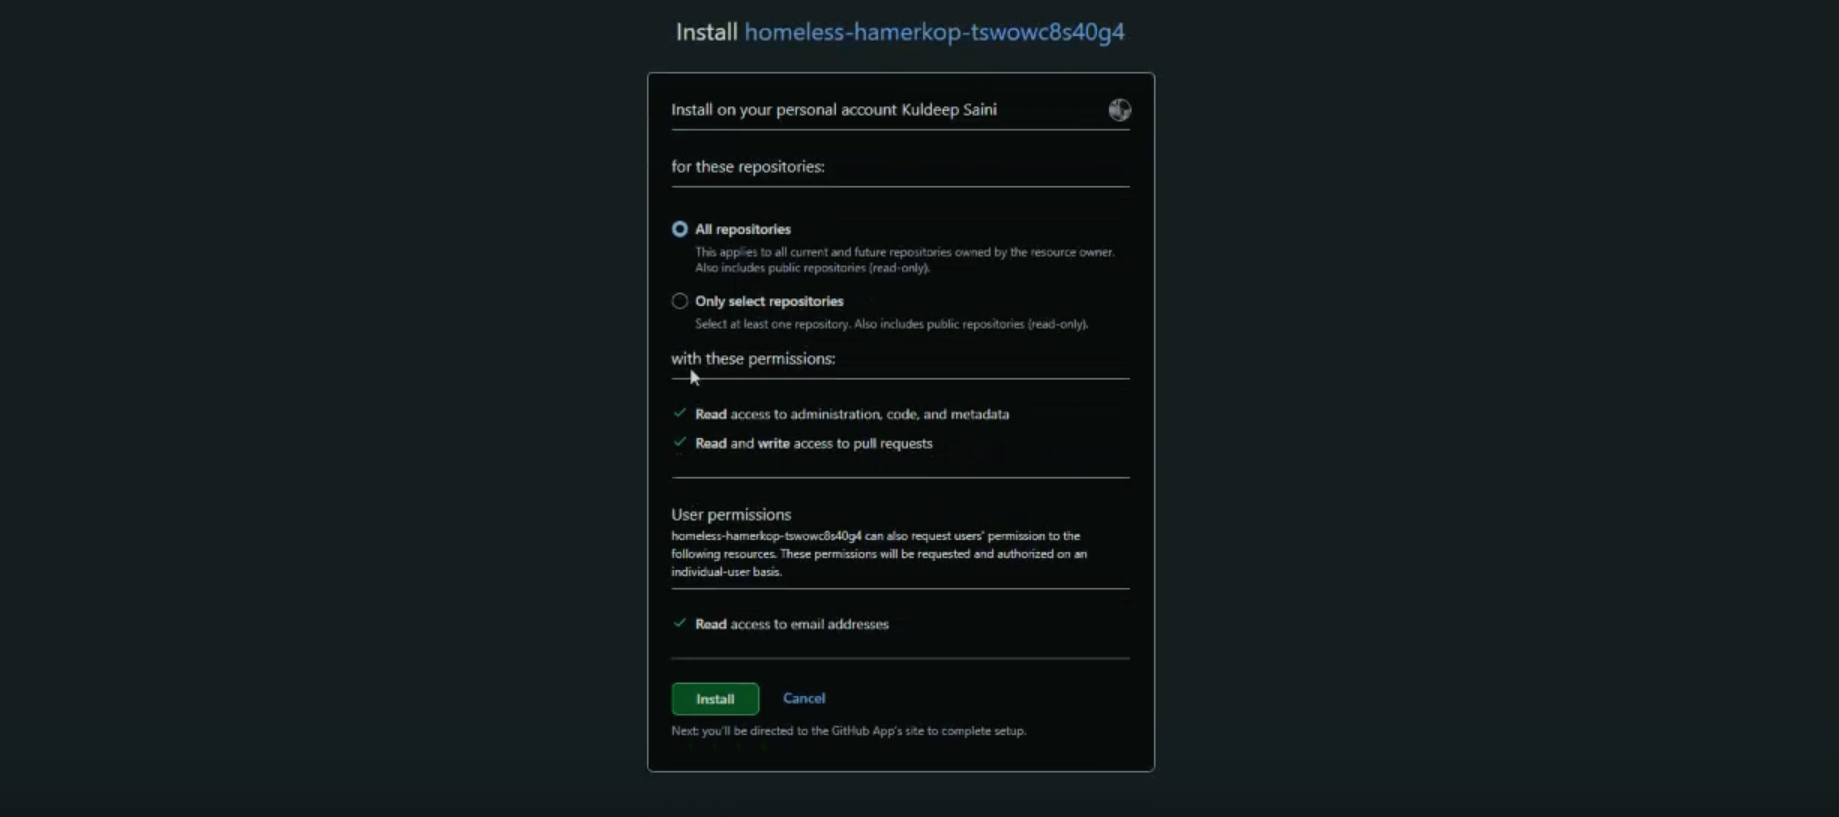
Choose whether you want to grant access to all repositories or only a specific one, and then click Install to complete the authorization.
How to Create project in Coolify
Navigate to the Projects section and create a new project.
You’ll automatically get a Production environment, but you can create additional environments if needed.
Select Private Repository, since we already connected GitHub in the previous step.
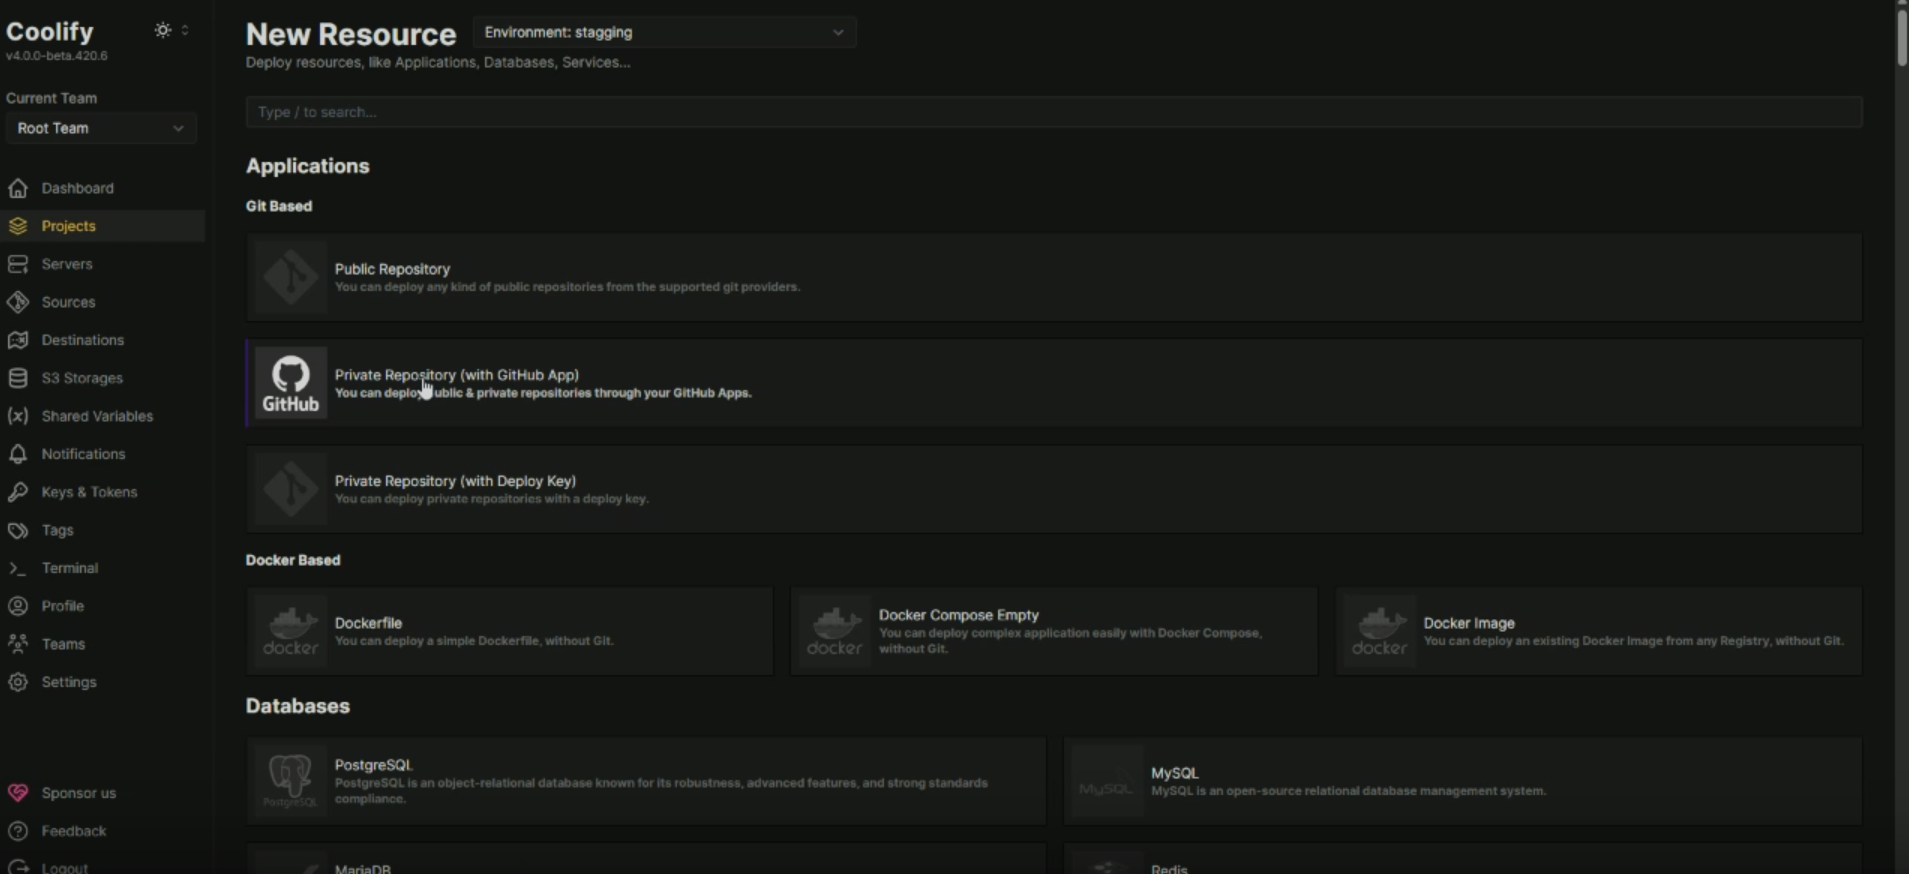
Choose where you want to deploy:
Local Server → Deploy on the same Hostinger machine where Coolify is installed.
Remote Server → Deploy on a server you added earlier.
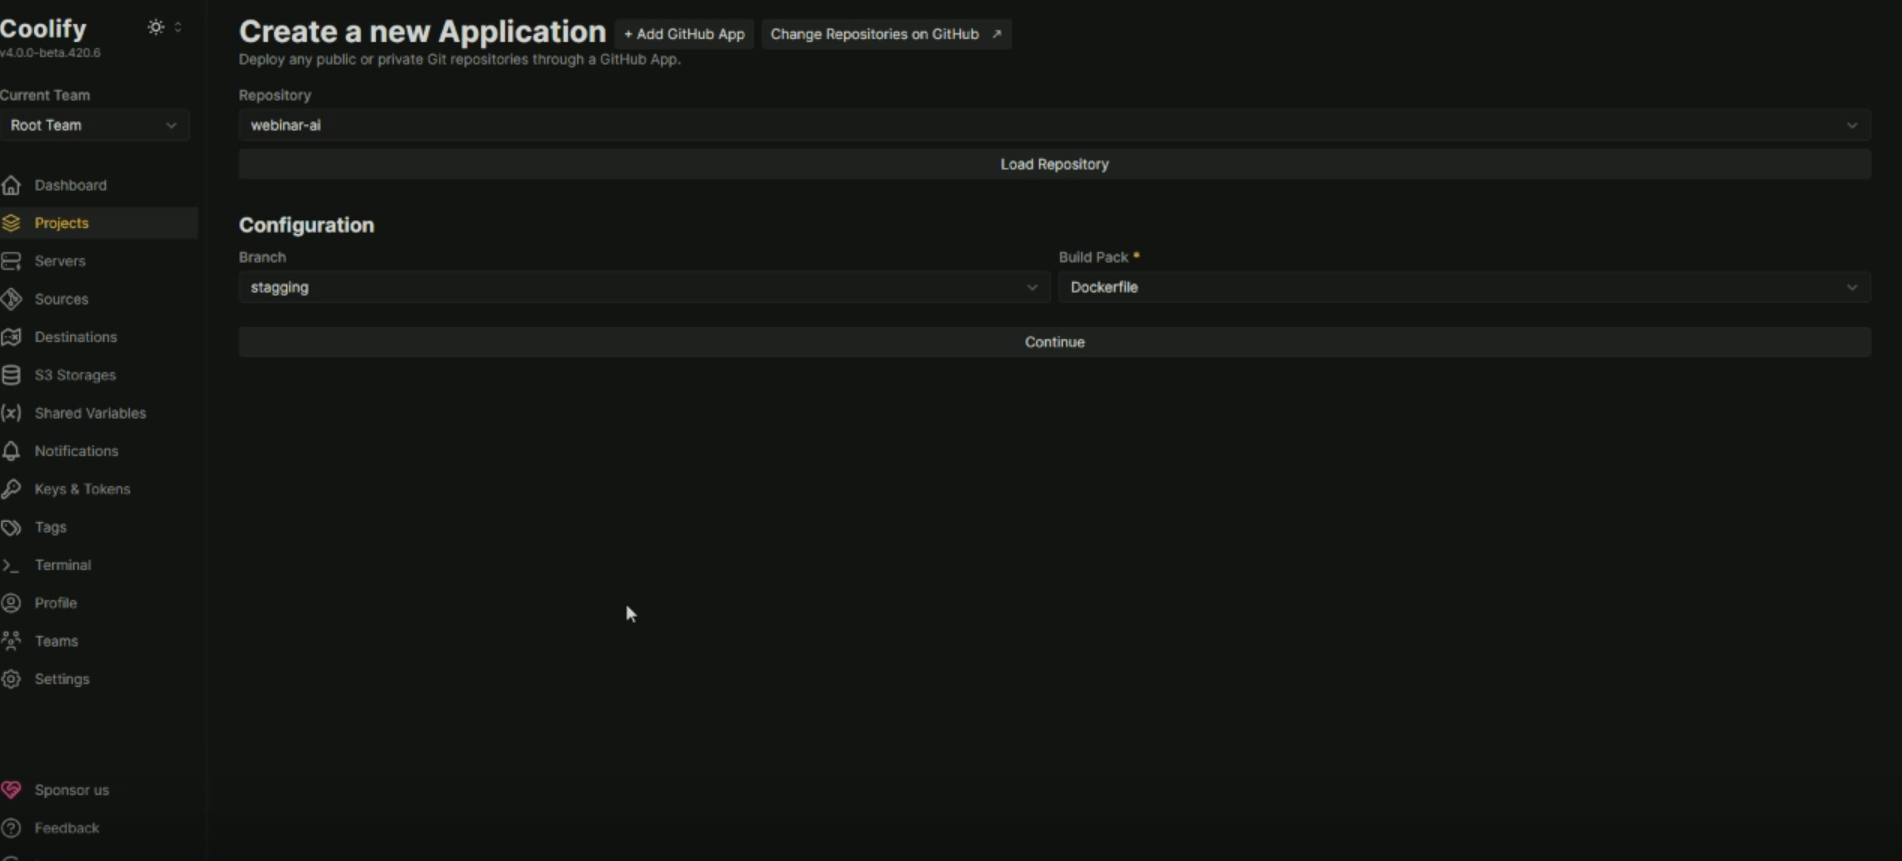
Select your GitHub App, then choose the repository you want to deploy.
Pick the branch you want to deploy under Configuration.
Change the build pack from Nixpacks to Dockerfile.
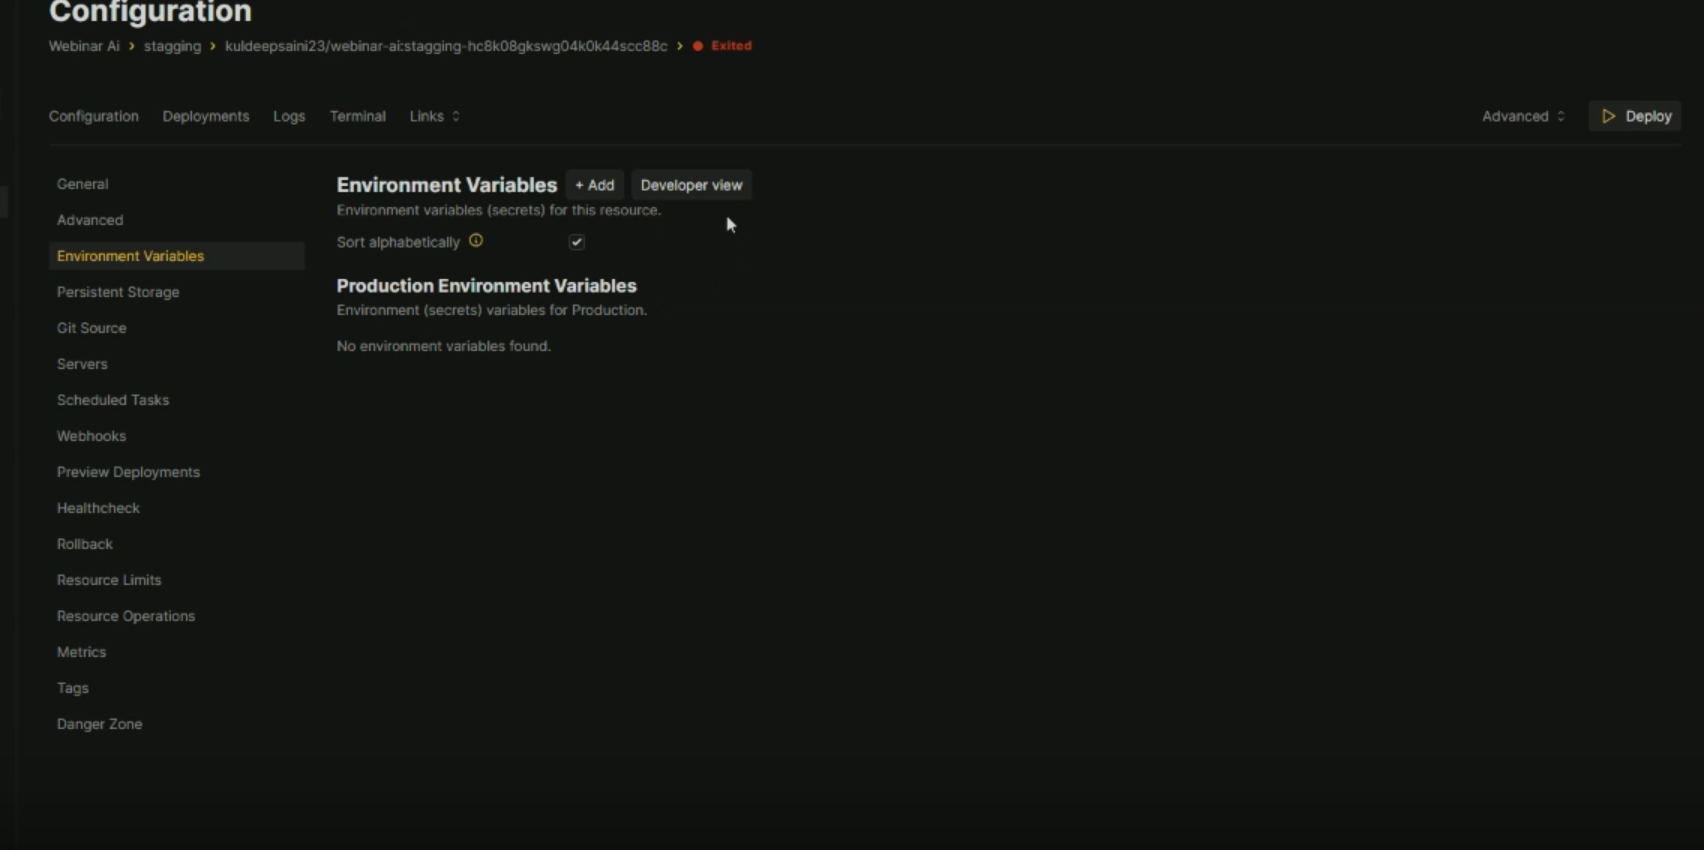
Add your environment variables under the Environment Variables section.
Enter your domain name. Since the remote server is already configured, Coolify will handle the domain setup automatically
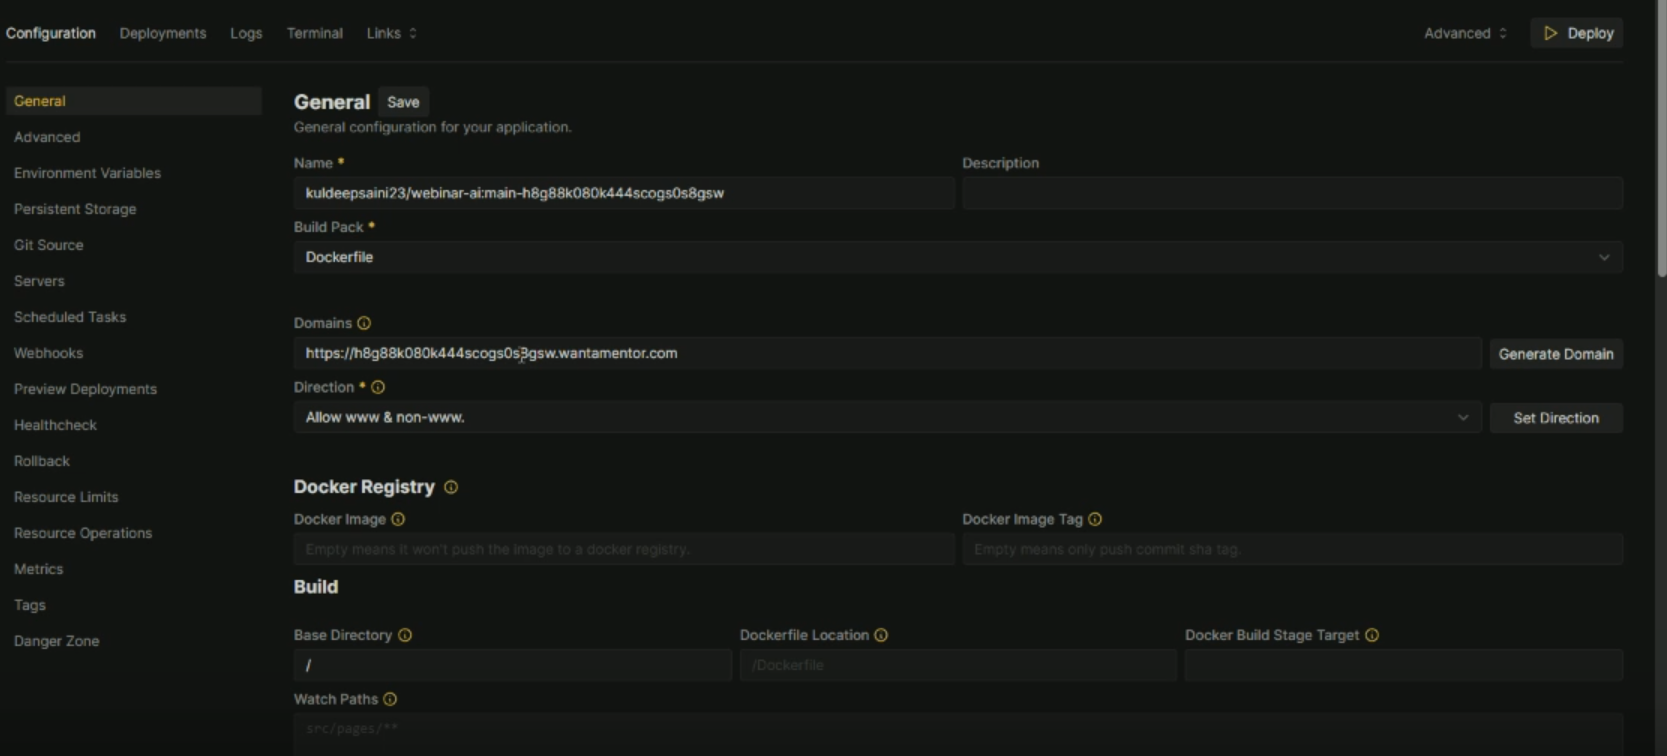
Click on deploy your application will be deployed on the domain you entered

How to setup auto deployment
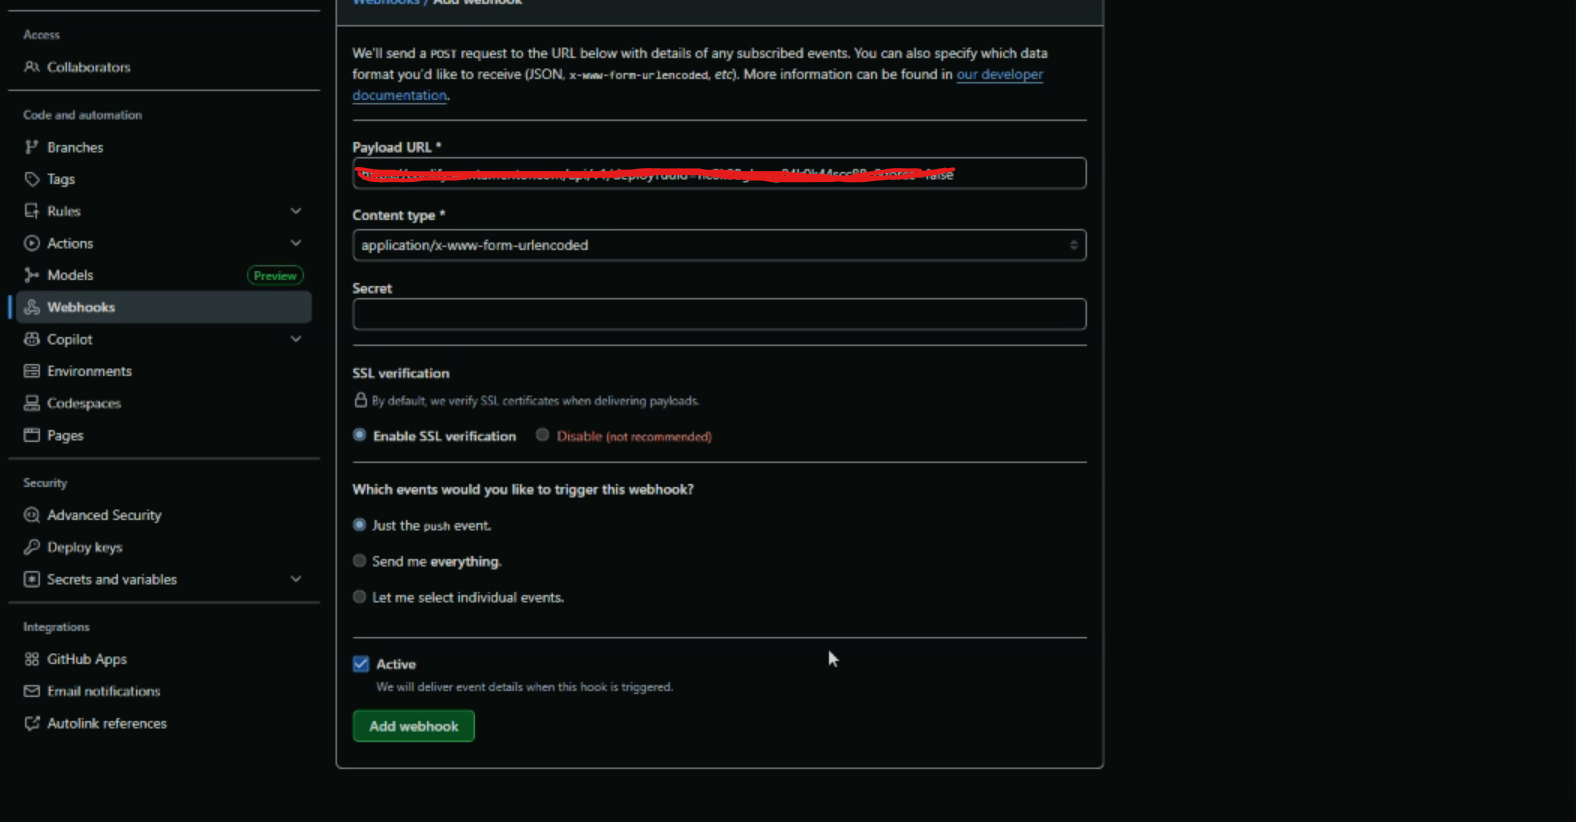
Open the Webhook tab in Coolify and copy the Deploy Webhook (Auth Required) URL.
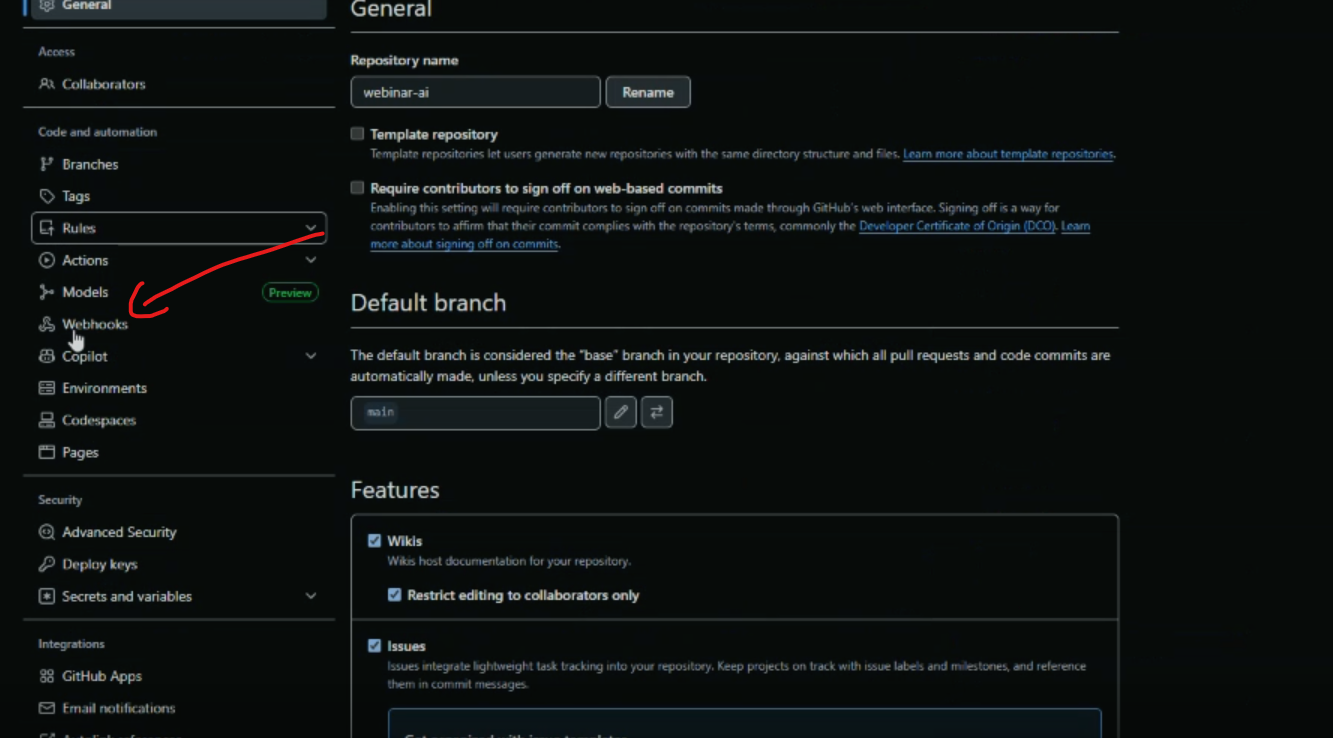
Go to your repository settings on GitHub and navigate to the Webhooks section.
Add a new webhook and paste the copied URL into the Payload URL field.
Hostinger features that help this setup shine
Automated weekly snapshots and VPS backups included in many plans, so you can roll back safely
Built‑in VPS analytics to monitor resource usage and performance
Managed firewall at the provider level for quick, sane defaults
Multiple OS choices and prebuilt applications, including Coolify, n8n, and more
Emergency/Rescue mode to recover from boot issues or fix backup/restore problems
Note: These provider features reduce the amount of custom ops work you need to do for a two‑server Coolify setup.
If you’re setting this up now, you can use our Hostinger link for an extra discount: hostinger.com/webprodigies and apply the coupon webprodigies.